Quick Start
Quick Start Guide to
Creating and Working with a New Project
This quick Guide is intended to help both new and experienced users of Symphony Pro create a new project, select the tools desired to work with greatest efficiency, and find links to the Help files for answers to questions which may develop while working with combinations of both new and ongoing tools.
Follow These Steps:
• When you see > in the directions below, look for the corresponding menu or toolbar buttons
• When you see FMI (for more Information): follow the link to Symphony Pro Help Files.
Creating a New Project
From the Project window follow these directions:
> ![]() > New Project > Quick Start Options
> New Project > Quick Start Options
If you have opened up Symphony Pro to a Score Page, you can find the Project Window by going to the Navigation Menu, and selecting the Projects Icon:
![]()
FMI: [Manual: Projects]
Selecting Time and Key
Basics with the Quick Start Options Page
After selecting the (+) sign to begin a new project, the Quick Start Options window will appear. Fill in your Title, Subtitle (if any), Composer, Key signature, Time Signature (+pickup). And, from the Edit Instruments selection, create the instrumental setup you wish to use. While remaining in this window, make sure to select the Score View Mode which best suits your iPad Screen*.
*Vertical Scroll Layout is the recommended page format for most projects
All of the Quick Start Options can be accessed at any time from within the score. The two top icons in the Navigation Menu will include all of the Quick Start Options as well as many more. The top icon is the Instruments Menu. The second contains the Score Menu with all Signature and Setup details.
![]()
FMI: [Manual: Quick Start Options, Instruments Menu, Score Menu]
Note: When you are unsure about the meaning of a particular
Icon or button, go to Help (![]() )
and select Quick Help. A map of the Score Window
will be found with definitions of the Icons and Menus surrounding the page.
)
and select Quick Help. A map of the Score Window
will be found with definitions of the Icons and Menus surrounding the page.
Selecting Time and Key
Basics from the Project Score Page
When you open a new project and leave the Quick Start Options untouched, Symphony Pro creates a default page with a key signature of C major, time signature of 4/4, metronome marking of 110, a Grand Piano selected, and a score title of Score (x).While the Quick Start Options page should cover most of the setup needs to modify these defaults, there may well be additional elements or changes you wish to make. From your open score page, you can set up or change the time and key signature, tempo, and add measure numbers needed for the score.
Follow this path to go to the Project Score Page:
> ![]() (Navigation popup menu) >
(Navigation popup menu) > ![]()
From this popup Score window, you will be able to write in your Title, Subtitle, Composer, and other text fields available in the menu. Proceed to complete the Key Signature and Time Signature.
Note the other choices in the Score menu. You can select Concert pitch note entry (and playback), modify Score layout, open the QWERTY Shortcut list, navigate directly to the app preferences page (under Home Sreen > Settings > Symphony Pro) containing more options, among other score configuration settings.
FMI: [Main Manual > Score Menu]
To Show or Customize
Measure Numbers / Bar Numbers
From the Project Score Page:
> ![]() (Navigation popup menu) >
(Navigation popup menu) > ![]() > Display Settings > None/every Line/or
Every Measure
> Display Settings > None/every Line/or
Every Measure
To Add Instruments
from Inside the Score
> ![]() (Navigation popup menu) >
(Navigation popup menu) > ![]() >
> ![]()
Choose the instrument you want from the list of available instruments. After
you have chosen an instrument, a popup dialogue box may ask for transposition
or placement in the score. You will be returned to the Instruments
window to add more instruments, change, or alter the position of your currently
chosen set. You will also be able to create a template of your
instrumental setup by selecting the export (![]() ).
).
To change instruments already created for your score, including the default Grand Piano, follow the Add Instruments pathway above, and select the instrument you wish to change. the Change Instrument dialogue will now allow you to select the instrument you want. Select the Back button, and you will be brought back to the Instruments window to make any other additions or changes.
To delete instruments, follow the pathway described above. Select Edit from the right hand side of the Instruments dialog box. A small circle will appear next to each instrument in your list. Check the circle on the unwanted instrument, and click on the trash icon. Note that you must have at least one instrument in the Instruments list at all times. The first default grand piano staff/staves cannot be discarded until an additional instrument or instruments have been created.
FMI [Instruments and Staves]
Setting Up Note Input
Methods
There are several ways to add notes in Symphony Pro: Use the method that best suits your own way of working, and is most productive for the kind of work you wish to accomplish. Symphony Pro has a particular advantage in its first release: all of the features that we have constructed in past releases can continue to be relied on to help speed your work, now including use of the Apple Pencil and the iPad Pro.
Use
the best tool for your work at hand.
Most input and editing controls are easy to find, but a few involving external control may take a moment to find and set up.
Note Entry-Edit/Select
Mode Toggle
Write Mode is engaged using the left-hand icon in the Notes Toolbar. If you see an arrow first, touch and slide the button up, and the pencil icon with pop up above it. Release your finger on the pencil icon. All symbols with small arrows above them work in a similar manner.
![]()
The Note Entry button must be selected for every input mode or device with the exception of editing while in Notewriting Mode (with the Apple Pencil or Touch). See [Tips and Tactics for the Apple Pencil] below. This button places the current score into construction mode, where we can place notes, articulations, and expressions, along with other musical elements for our project. When the Construction mode is selected, any or all input modes described below can be active, including the use of finger touch, an older iPad writing stylus (capacitive), the Apple Pencil for the iPad Pro, screen keyboard, screen guitar, and external MIDI devices.
Write Mode with Touch
With the left-hand pencil icon in the Notes Toolbar selected, the Write Mode will be available for touch and/or a capacitive stylus on all iPads. In this mode all note input actions are engaged, including addition of expressions, dynamics, instrumental techniques, text, and the favorites bar. At any time, the zoom feature can be used to expand your score to the size necessary to place a note in the right position.
FMI [Main Manual > Add Notes] for more information on adding notes without an on-screen instrument. A capacitive stylus for older iPads will function similarly to finger touch in this mode.
Write Mode with
On-screen piano or Guitar
Add an On-screen piano or on-screen Guitar/Bass
neck by going to the right hand keyboard symbol in the Notes Toolbar. Its
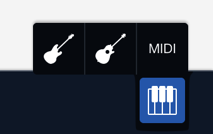
default symbol is the small keyboard (![]() ). Other choices are available when
you touch and hold this button:
). Other choices are available when
you touch and hold this button:

Touch and select the piano button, and the on-screen piano will appear at the bottom of the screen.
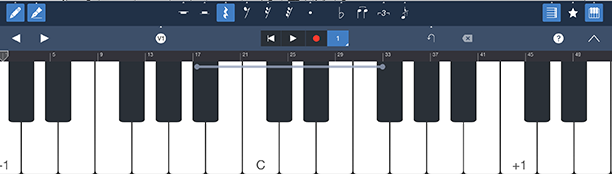
This is often the most efficient way to enter notes, even for those with limited keyboard or guitar ability.
Keyboard players: remember that you can expand or contract the on-screen piano size to obtain an optimal size for your personal on-screen needs. Touch the small dots on either the left or right side of the center-key shift bar to expand or contract your key size on screen.
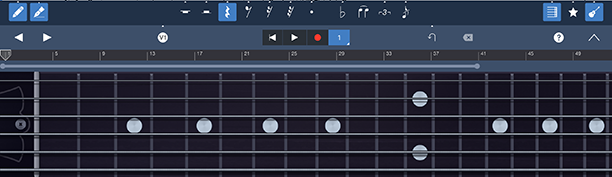
The on-screen guitar and bass work in a very similar fashion to the piano, but with strings and frets available for note entry.
Write Mode with
External MIDI instrument
Also in the Instruments Expandable Button, you will find an external MIDI instrument connection selection as well.

MIDI Keyboard
Connection with USB
To access a wired MIDI keyboard, connect your external keyboard via the Apple Lightening to USB camera adaptor. After you have connected your MIDI keyboard, select the MIDI Input from the Keyboard Menu.
MIDI Keyboard
Connection with Bluetooth
Bluetooth Keyboards are available to connect wirelessly to the iPad. Make sure that your bluetooth keyboard will connect to your current generation of iPad. Korg products will need a small app. available free at the Apple App. Store to connect their bluetooth keyboards up to an iPad. With Bluetooth recognized by the iPad, the keyboard will be recognized when the Midi Input has been selected (as above). [FMI: Main Manual > MIDI Devices]
Entering Notes with
On-Screen Piano or MIDI Input
Enter notes into the score by selecting the staff and measure in which you wish to begin adding notes, choosing a note duration from the Notes Toolbar, and touching the note or notes on your keyboard you wish to have entered into the score.
With the On-Screen Piano, Rests can be added automatically by choosing the equivalent rest value, selectable by the small arrow found above each symbol.

Write Mode with QWERTY
Keyboard
The QWERTY keyboard connection is one of Symphony Pro's hidden gems for music construction. Created to enable those who cannot work with the intracacies of an iPad screen, there is an extensive set of note and function commands available directly from a connected (Bluetooth or the Lightening input) QWERTY keyboard. You can learn the default commands (carefully developed with our users who need and use accessibility tools, or you can replace any or all of the QWERTY key defaults with your own choices for each of the supplied commands and tools.
FMI: Go to the QWERTY Key Defaults list to find the normally operational commands available on the external keyboard.
FMI: To change the default commands, go to [Reassign key commands] in the Help Manual. Remember to make your own list when you change the default commands.
To access the QWERTY keyboard, connect your external keyboard via either bluetooth or through the Lightening to USB camera adaptor to a wired keyboard.
Importing MusicXML and
MIDI
MusicXML and MIDI import/export, are powerful file protocols for importing work from previous sessions, or from other applications that support these file formats. Most serious music notation applications available for PC and Mac desktop or laptop computers allow the user to save work in the MusicXMLformat. Once saved in this common file format, a MusicXML file can be imported into any other application that has enabled importation of this file format. Symphony Pro can both import and export files in MusicXML.
In a similar fashion, we can save, import, and export our work in a MIDI format. However, the MIDI protocols were created almost 40 years ago to allow hardware synthesizers to talk to each other in rather simple ways. While there have been many revisions to the MIDI protocol over the years, MIDI remains a simplified set of music designations, and does not contain many of the important elements that we include in a full musical score. When you save or transfer your work using a MIDI file format, you will lose articulation, expression, and specific graphic indications that often make up the heart of our music. On the other hand, we can transfer solid musical basics via a MIDI file to sequencer and recording applications where the human instructions for musical interpretation are not involved, and we want to combine our notation work for playback with sophisticated instrument files, and with other live and sampled tracks.
– Symphony Pro will let you work with as many of these note construction methods as you are able to connect or engage. But beware! Those of us who test each and every feature of an application can attest to the fact that both intelligent users and intelligent applications can be easily confused by too much information, and too many possibilities. Use the best combination of tools for your work at hand.
Working with Select
Mode
For those of us who are creating a new song or composition, the process of creating music involves a great deal of revision and testing before we settle on a completed passage or finished product. Do I want that note, that rhythm, or sequence? Is this the correct harmony? And, for those of us used to writing with a pencil on paper (yes, there are still some of us around), this handwriting on a glassy screen involves a fair number of "Oops" issues where the Apple Pencil makes marks far too easily. Now we have to get rid of them. Changes, mistakes, development, alteration--these are all part of the process, and while we all would like the compositional process to work in a completely forward motion, it simply does not move in this manner as often as we would like. The same issues are a part of orchestration, arranging, copying a part, and even editing an already constructed work. The trick is being able to fix or modify what needs to be changed, and move on in a seemless way.
When you select the Edit/Select mode (![]() ) instead of the Note Entry/Write Mode
(
) instead of the Note Entry/Write Mode
(![]() ), notes, measures, full staves,
and even full systems can be copied, pasted, modified, and enhanced with
additional indications.
), notes, measures, full staves,
and even full systems can be copied, pasted, modified, and enhanced with
additional indications.
When the Apple Pencil is active, access to editing tools does not depend on being in the Edit/Select mode. Use the Lasso Tool (described above) to bring up an editing tools popup menu. Or, long tap the top of a measure line to bring up a popup menu with measure editing tool access through Edit Bar selection. The Apple Pencil also works as a Touch selector for all other editing functions as well.
Symphony Pro Touch (also using the Capacitive Stylus) taps, long presses, and swipes in Edit/Select mode are the standard method for acessing editing functions for both note editing and for larger measure changes and additions. QWERTY keyboard commands can also move the cursor around your project and select a note or passage.
FMI: [Main Manual > QWERTY Keyboard] To Find the Editing tools you need, choose one of the following actions:
–
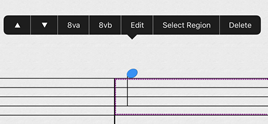
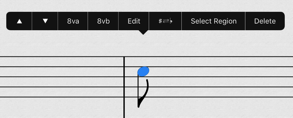
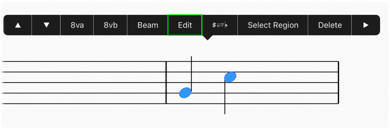
Touch/tap the note, or note within a
chord that you wish to edit. The note will turn blue and a popup editing menu
will appear above the note with multiple choices for note changes, deletion,
and further Region Selections.
–
Touch and swipe across a series of
notes. The notes will turn blue, and a popup editing menu will appear with
choices for modifying a series of notes.
–
Long Press and hold a point near
the first note of a series you wish to change. On release, the familiar iPad
Selection Box will appear, with left and right handles for dragging to surround
a few notes, measure, or entire passage. The Selection Box can extend up or
down across contiguous systems on your page as well. Drag and release one of
the blue dot handles and the editing tools popup will appear with multiple
editing choices.
–
Tap a beam to activate
selection handles for repositioning its length and direction.
–
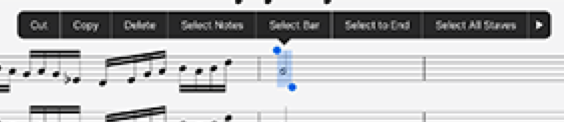
Tap the top of any bar line and a popup
with spacing features and access to further modifications to the right-hand
measure with will available by touching Edit Bar.
–
If you
made a touch, press, or swipe by mistake, simply make a second
touch anywhere on the screen to undo your selection.
NOTE: many of the popup menus that appear on a touch will take you to either the Note Properties or Measure Dialog windows. You can access an extensive number of modifications from these windows.
FMI: [Main Manual > Note Properties and Measure Dialog windows]
With a note or passage selected (blue selection), on-screen instruments and connected external devices will facilitate more editing possibilities:
–
Touch an icon (articulation, dynamics,
etc.) in one of the open Symbols menu bars, and it will attach to each of the
selected notes. You can add staccato marks to a complete passage of notes with
a single tap. But beware: selection of a dozen notes and a tap of a dynamic
marking may well bring up a dozen Fortissimos. Of course, if that's what you
want...
–
With the on-screen piano open, selected
chords are displayed in blue. Deleting, adding, and changing notes in a chord
is quickly accomplished by tapping on a blue key to delete that note from the
score, and tapping on a white key to add a note.
–
With an external QWERTY keyboard open,
note duration values can be designated with the touch of a key, while the Apple
pencil or touch is used to place the note (Write Mode without Handwriting
mode).
Handwriting Recognition Guide
Working with the Handwriting Tool
The initial implementation of music notation via handwriting on a screen is a major step forward for computer music notation. While there are several apps available on both the PC and Mac platforms, all of them are in their infancy, and all of them point to a new generation of flexibility for music creation. Following the guidelines below will help to maximize your handwriting input. These tips have taken shape during the development of handwriting for Symphony Pro. Use of other applications on various platforms outside of the iPad have also contributed to these suggestions.
It is perfectly normal for humans to make marks on a screen that we did not expect nor want to make. We create notes where we don't want them, or decide that those were the wrong notes. In all of these instances, a computer needs to interpret the marks we have made on the screen. Just as writing with a pencil on paper, the eraser is a very handy tool. There are several methods of erasure when the Handwriting Tool is enabled, discussed below.
Handwriting Tool
Supported Features
•
Sketch notes, chords, and rests into a
highlighted measure, including necessary flags, stems, beams, augmentation dots
and ties internal to the measure.
•
Add common articulations and phrase
marks right along with your note entry.
•
Easily add meter changes to the
beginning of any measure.
•
Draw Tuplets
over multiple beat groupings, both beamed and unbeamed.
•
Add clef changes on any measure
whenever you need them while entering notes:
![]()
![]()
•
Lasso a note or notes with their
additional indications, for cut/copy/paste and editing operations
•
Activate and use both the Handwriting
Tool (including Lasso) and Edit/Select
Mode for full creation and editing functions: (![]() +
+ ![]() )
)
Note: the
Handwriting Tool cannot yet support dynamic indications, or general text entry.
Handwriting Mode using
the Apple Pencil and iPad Pro
Symphony Pro's Handwriting Feature was designed to use the accuracy of the Apple Pencil on the iPad Pro. The Apple Pencil only works with the two sizes of iPad Pro. To connect the iPad Pencil, plug your Apple Pencil into the Lightening input on the iPad, and pair your pencil.
The Handwriting Mode can be used in all notation entry modes; Write Mode (![]() +
+ ![]() ) and Select mode (
) and Select mode (![]() +
+ ![]() )
)
FMI see Write Mode Setup above) are the most common. In Edit/Select Mode, the Apple Pencil will function both for note entry and for editing.
The entire Handwriting Mode button can also be deselected: ![]() .
In this configuration, the Apple Pencil will function in a similar manner to touch
(similar to a capacitive stylus).
.
In this configuration, the Apple Pencil will function in a similar manner to touch
(similar to a capacitive stylus).
Handwriting Mode with
Touch or Capacitive Stylus
The Handwriting Mode is designed for Apple Pencil and iPad Pro use. However, entering notes and other musical indications via the Handwriting Mode can be accomplished as well on other iPad models and iPad Pros without the Apple Pencil. Long-press the Handwriting Tool button and choose "Use Touch Input" in the pop-up menu.

In Handwriting/Touch Mode, all of the handwriting features are active, just as with the Apple Pencil. However, it will most likely be necessary to use Symphony Pro's zoom feature regularly to draw notes and articulations that can be recognized and then converted to print in an accurate fashion.
Tips and Tactics for
Accuracy
With the Handwriting Tool engaged (![]() or
or ![]() ):
):
– Select a single staff
measure, indicated by a purple dotted highlight box that will surround the
measure, and begin to add notes, stems, beams, ties, phrase marks, and
articulations. When you are through entering notes and indications for the
measure, tap anywhere outside of the highlighted box with either the Apple
Pencil or normal tap. Symphony Pro will initiate the handwriting recognition
engine, and replace your sketches with finished, printed musical notation. You
don't need to wait! You can tap directly into the next measure you wish to
sketch and continue note entry. You do not have to complete a measure!
Just tap outside of the purple highlighted area whenever you want to see how
your handwriting has been recognized. Re-enter any measure to edit it or add
material by a simple tap. (Remember that the Apple Pencil cannot yet add dynamic
markings, or text).
Symphony Pro's recognition software is quite good at recognizing our music handwriting.
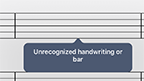
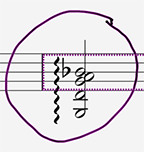
However, if you have written something like this: ![]() and are not getting the note recognition you
want. Or, you are receiving the following dialog:
and are not getting the note recognition you
want. Or, you are receiving the following dialog:
Try some of the tips that a generation or two of professional copyists for film music have learned from the daily need to have their parts read at sight by studio musicians who need to scan their music perfectly the first time:
- Create noteheads with a slight diagonal tilt to them, not too
thick, more oval than round.
- Make sure that
the center of the slightly slanted notehead is
the center of the space or line you want.
- Always connect
your stems to their respective beams when grouping.
- Crowding notes
will not work. If necessary, touch and hold the right-hand measure line of
your selected measure. While holding the pencil down, drag your measure to
the right. The entire staff will stretch with your move. The extra space
created by the stretch should give you some room to continue writing.
Measures with many notes may need to have the stretch operation repeated
after a beat or two or recognition to continue reassessing the space you
need for your measure.
–
There
are always certain notations that cannot be recognized by the notation
recognition package. You can find a catalog of most supported gestures at: https://developer.myscript.com/music-list
Useful Gestures: Lasso
Select
– The Lasso
feature provides not only a way to delete an unwanted mark, but also activates
a popup with deletion, note movement (increment and decrement), enharmonic
equivalents, Select Region, and Edit menu buttons. This feature works in both
Note Entry and Select modes. Draw a circle around the note or notes that you
want to select for modification.
The lasso command allows for creating a
Note Selection to transpose or edit notes. You can otherwise do the same by
dragging a rectangle over the notes with an initial long-press.
–
When
you lift the Apple Pencil (or Touch) the popup modification options will appear
in Select mode
Useful Gestures:
Two-Finger Swipe to Undo (Apple Pencil Only)
–
To undo your latest operations (pencil marks, notes, etc.), you can
perform a two-finger swipe to the right, and watch the latest
mark swept off your score. If you want to return that deleted
operation, sweep two fingers to the left, and you replace the last deleted
operation. This process can delete or replace multiple sequential past pencil
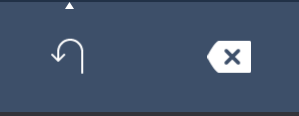
or touch marks. Don't forget about the other two delete methods: the Undo/Redo button, and the backspace/delete
buttons. Both are remarkably useful. Let's face it, we all make both mistakes,
and human indications on the surface of our intelligent iPad device will
certainly be open to divergent interpretation. For those of us who are left handed,
picking up our palm and placing it somewhere else on the screen continues to
confound even the smartest sensors on occasion. The Handwriting recognition
feature wants to interpret the marks it sees. It knows all about palm print
rejection, finger tapping, pencil tapping, and palm sliding, but occasionally
wants us to clean up our acts as humans. We have to be aware of our own
clarity. That's why there are back and undo buttons:
FMI: undoing and redoing
changes
Useful Gestures:
Long-Press to Cut/Copy/Paste
– Sketch
in notes, time signatures, clefs, articulations, tuplets,
and phrase marks in both Note Entry and Select modes. You will probably find
that the Write Mode is easier to work with as you sketch in new material. When
you have editing work to accomplish, the Edit/Select Mode will facilitate
cut/copy/paste operations, and provide quick access to the editing tools via a
long press on the note or area to be changed:
Useful Gestures:
Two-Finger Tap to Edit Bar Properties
–
Meter
and clef changes are available instantly with the Handwriting Tool by simply
sketching them in. Time changes must be written in at the beginning of a
measure, while clef changes may be written in at any point in a measure.

–
However,
an often-faster way to specify time, key, and clef changes is a two-finger tap
gesture to show the Measure Dialog
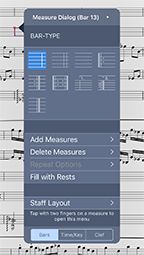
FMI: See
[Main Manual > Measure
Dialog Window]
Useful Gestures:
Long-press Note to Select
You can hold down your Pencil or finger on a note-head to select a note, after which you can transpose by dragging vertically, or delete/edit other properties from the available context items.
Useful Gestures: Note
Adjust Menu for editing note values
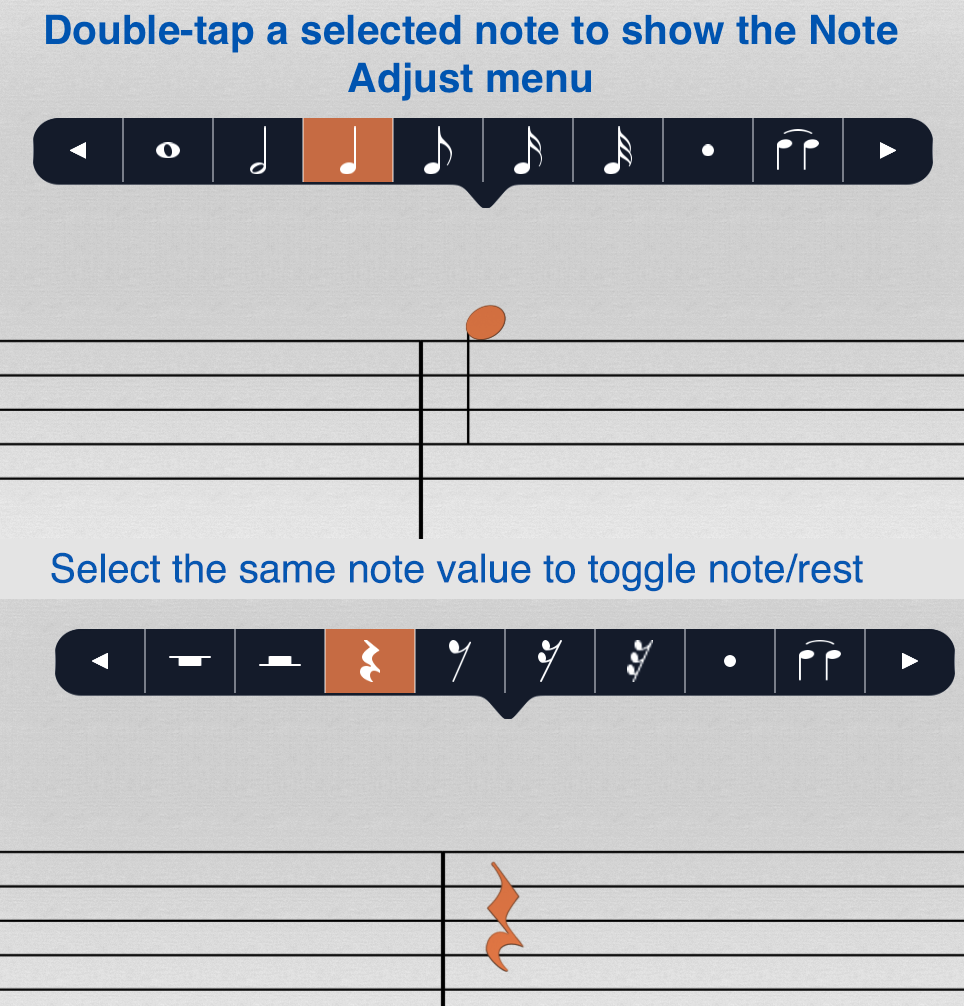
Double-tapping a selected notehead in any mode
will show the Note Adjust Menu, allowing quick modification of note value,
augmentation dot, and tie properties.
Other Tips
– Tap the left or right nav-bar arrow to move the Handwriting Area (purple outline)
to the previous or next bar with autoscroll
– When you have a number of
editing operations to make, switch to Select mode while continuing to engage
the Handwriting Tool. On occasion, your workflow may go faster with Select on,
but with the Handwriting mode deselected. You can continue to use the
pencil for its touch capability in Edit/Select mode even when the Handwriting
feature is off.
– With multiple note input
methods available, it is quite possible to have the on-screen piano selected
while using the Apple Pencil. In fact, Symphony Pro will allow an external
QWERTY keyboard and/or an external music keyboard to be attached as well.
– Activating a combination of
input methods may work best for you when creating and editing your music. Try
this:
o
Open
the on-screen piano in select mode while continuing to engage the Apple Pencil.
The keyboard can select notes that need simple changes like duration, or pitch
change, while the Apple Pencil can draw in articulations and phrase marks. The
visual feedback of seeing notes on the keyboard, when selected, aids adding and
deleting notes significantly easier, particularly with chords.
o
In
Select Mode, touch the chord to be modified.
o
The
keyboard shows the notes that have been placed in the selected chord. Simply
deselect the unwanted notes on the keyboard. More changes can be made directly
with the Apple Pencil. This method is quite fast, and
displays the notes you want to edit in a passage.
Limitations
Handwriting
recognition is continually being improved for 2018, and the following limitations
are central to future releases:
– The following notations are unsupported until later in 2018
o
Recognition
of tablature
o
Recognition
of noteheads for percussion; for the time being,
please see here
for an overview of key touch shortcuts while working with the Handwriting tool
in this context
– Upcoming features in 5.2 (Q2-2018)
o
Annotations
layer
o
Dedicated
support for 3rd-party BlueTooth styluses
o
Shortcuts
and context items to make handwriting & annotations all the more seamless
– Other issues to be addressed the
upcoming release (5.2), early Q2
o
Octave
clefs & C-clefs, including notations within these staves
Connecting a
Third-Party Stylus
– If you don’t own Apple
Pencil, but own a Bluetooth enabled Adonit™ or Wacom™
stylus, you can now pair & configure your device with SP via the following
steps:
o
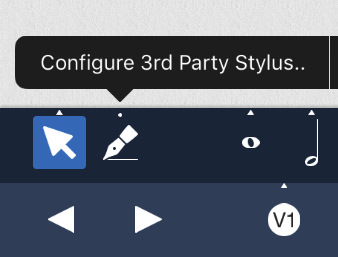
Long-press
the Handwriting tool icon
o
Choose
Configure 3rd Party Stylus from the menu items that appear:
o
Choose
your device manufacturer (Adonit or Wacom) to bring
up the configuration menus
Annotations
Version 5.2 features
annotation support with Apple Pencil, touch, and thirdy-party
stylus – provided that you have the Handwriting upgrade enabled. More information
along with instructions are available here.
Feedback & Bug
Reports
– We encourage feedback from our user base to add to the above guidelines, and will endeavor to include important additions as time permits in future releases.
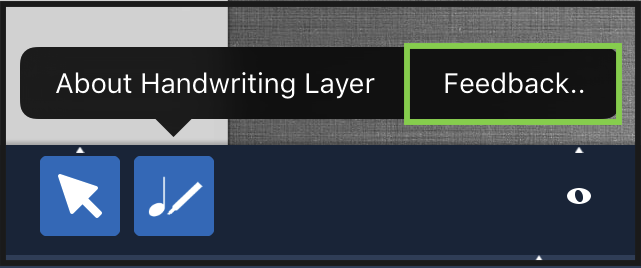
– If you encounter bugs or difficulties with this new feature, informing us via the designated option will assist our goal in continuously improving the recognition engine. If you need any assistance with this feature, we’re also glad to provide assistance 7 days a week. To find this designated form:
• Long-press the Handwriting Tool icon to bring up available context items
• Tap Feedback as shown
3RD Party
Technologies
SP
Handwriting Tool was developed with the help of MyScript® Music Software Development Kit
Projects
Projects
can be created and managed in the Projects (![]() ) menu. The Projects menu box is located in the
Navigation popup menu indicated by the large (^) symbol at the right of light grey
transport bar towards the bottom of the Score View, or on iPhone, at the
top-right corner.
) menu. The Projects menu box is located in the
Navigation popup menu indicated by the large (^) symbol at the right of light grey
transport bar towards the bottom of the Score View, or on iPhone, at the
top-right corner.
From
the Project window, an existing
score can be opened by simply touching the desired project. The icons across
the top of the Score window are
described below, plus the addition of a Help icon, Project icon or List view
choices, and the Select button which, when touched, enables the selection of
one or more projects for renaming, Exporting, file organization, and deletion.
Open an Existing Project
Tap
on a project to open it up for editing and playback.
Create a New Project
Tap
the Start New Project (![]() )
button then select New Project to quickly create blank project and begin
editing or choose to create one from a template. You can import a file to work
on by selecting Copy From iTunes.
)
button then select New Project to quickly create blank project and begin
editing or choose to create one from a template. You can import a file to work
on by selecting Copy From iTunes.
Copy a Project
Tap
the Select button, select a project, then tap the Copy button (![]() )
to create a duplicate file.
)
to create a duplicate file.
Deleting Projects
Tap
Select, then tap the Trash (![]() )
button. In the list view, tap on Select, tap the Minus button of the item you
wish to delete, then tap Delete to confirm. Alternatively, you can swipe an
item to the left to delete an item.
)
button. In the list view, tap on Select, tap the Minus button of the item you
wish to delete, then tap Delete to confirm. Alternatively, you can swipe an
item to the left to delete an item.
Rename an Existing Project
With
the project open, open the Scores (![]() )
menu. Tap on the first field under the Project heading to change the title of
the current composition. You can also change the composer by editing the text
in the second field.
)
menu. Tap on the first field under the Project heading to change the title of
the current composition. You can also change the composer by editing the text
in the second field.
Saving
There
is no need to save manually because your projects will automatically be saved
for you whenever you start a new project, close a project, or close the app.
Autosaving can be disabled by Locking a Project.
Exporting a Project or Syncing a Project to iCloud
Tap
the Select button, choose the project you wish to export, and touch the Export
(![]() )icon
on the top left of the menu bar. There
are several export options as well as export destinations to choose from. Audio, MIDI, .XML, and graphic formats are
all available for Export.
)icon
on the top left of the menu bar. There
are several export options as well as export destinations to choose from. Audio, MIDI, .XML, and graphic formats are
all available for Export.
Important Notes:
Regarding iCloud Storage (Part of the Complete Bundle):
•
Saving
a project to iCloud is currently unsafe when multiple devices share a document,
as overwrite warnings are not generated, and Saved work may be lost.
•
Projects
saved to iCloud are not stored locally, and are removed from local storage once
the upload is successful.
•
After
launching the app, it may take some time for the list of iCloud-based projects
to appear in the Projects Window, but no longer than 30 seconds. If they ever fail
to appear, please make sure that you’re logged into iCloud. To check this, go
to Home Screen > Settings > iCloud, and verify that the account shown
under this section is the one with which you have uploaded documents earlier.
Regarding the Export Menu:
•
To
retain selected Project formats and destinations, Symphony Pro will not export
more than one document at a time when attempting to use the Export Menu popup
icon (![]() ).
).
Tag a Project
Tagging
frequently used or important projects will pin it to the top of the view to
make it easier for access. To tag a project, tap Select, select a project, then
tap the Favorite (![]() )
button. You can untag a project by tagging it again.
)
button. You can untag a project by tagging it again.
Create a New Folder/Adding Projects to a Project Folder
To
create a new folder for your projects in the Projects menu, go to the Projects
Menu via the Projects icon in the Navigation Menu popup. Tap the Select button inside the Projects
Menu Bar, and the Menu Bar will display the Project Features icons. Select at least one Project file, and tap the
folder icon (FI) in the Menu Bar. Create
a name for your new folder, and select one of the 3 choices presented: Create Folder, Move to Existing Folder, or
Cancel if you wish to start over.
Add
projects to a current project folder by tapping the Select button in the
Project Menu Bar, select the projects you wish to add to a folder, and tap the
Folder icon. Select the box entitled:
Move to Existing Folder to complete the operation.
Renaming a Project from the Project Menu
There
are two convenient ways to rename a Project.
From the Project menu, tap the Select button, select a Project you have
created, and touch the Rename icon ( ![]() )
in the Project menu bar. Enter the new
Project name in the text box, and touch Rename.
)
in the Project menu bar. Enter the new
Project name in the text box, and touch Rename.
Projects
can also be quickly renamed from inside your Score itself. Once your score has
been opened (see above), tap the Navigation Menu button (^), select the Score
icon ( ![]() ), and the Score window will open to rename
your project by touching the current name, and using the cursor to edit the
text or replace it.
), and the Score window will open to rename
your project by touching the current name, and using the cursor to edit the
text or replace it.
Templates
Templates
are designed to help you quickly create projects based on pre-selected
settings. To start a project from a template, first tap on the Start New
Project button (![]() )
then tap Choose Template to bring up the menu, then select a template from the
list to begin editing right away.
)
then tap Choose Template to bring up the menu, then select a template from the
list to begin editing right away.
To
delete or rename a template, enter Select mode, select a template, then tap on
the Trash (![]() )
icon to remove a template or the Rename (
)
icon to remove a template or the Rename (![]() )
icon to change it's name. Only user created templates can be edited.
)
icon to change it's name. Only user created templates can be edited.
Create New Template
Inside
the main Score View, bring up the Tracks menu (![]() ),
and tap on the Create Template (
),
and tap on the Create Template (![]() )
button. You will be prompted to create a new template. Once confirmed, a new
template will be created based on the project you are currently working on.
)
button. You will be prompted to create a new template. Once confirmed, a new
template will be created based on the project you are currently working on.
Expandable Buttons
An
Expandable Button is indicated by a small triangle/arrow found above or below
an icon or symbol. These arrows indicate that a choice of two or more related
options is available for selection.
•
Example: the Instrument icon (![]() )
when touched, brings up a toolbar with on-screen Bass, Guitar, or Piano
available for note entry. An external
MIDI instrument may also be chosen in this submenu. The Notes Toolbar
illustration below shows this expandable button along with the toolbar containing
the above choices.
)
when touched, brings up a toolbar with on-screen Bass, Guitar, or Piano
available for note entry. An external
MIDI instrument may also be chosen in this submenu. The Notes Toolbar
illustration below shows this expandable button along with the toolbar containing
the above choices.
To
choose a submenu option when you see the triangle, tap and hold on the button:
perform a slide gesture to the appropriate selection in the popup menu.
Expandable Buttons show the most recently activated button: Once you release
your finger, the new icon will activate, replacing the previously selected
icon.
• Drag & swipe up
over any expandable button with a triangle indicator (e.g. On-Screen Piano, as
illustrated above) to expand the full items
• Drag your finger to
another item to activate a different option
• Quick-tap to
deselect any expandable or non-expandable button
• An extra-long-press
will keep the button open after releasing your finger
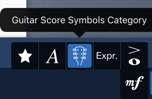
• Expanding,
dragging, and hovering-over an expandable button will reveal the name and/or
function of the button you’ve highlighted. An example is shown by hovering over
one of the Score Symbols expandable items:
Other tips
• If you wish to
deactivate an Expandable Button, if applicable, as might be the case with
accidentals, tap once to deselect.
• Expandable Buttons
are used throughout Symphony Pro. Remember to reselect an icon (it will highlight in blue) to re-engage the
icon’s tool or operation!
• In some cases,
Long-Pressing an expandable button icon and releasing your finger/stylus will
reveal a set of context options for the corresponding tool. An example is shown
when performing the gesture on the Handwriting icon (highlighted).

Score
From
the Project Window, any saved
project may be opened with a quick tap on the desired icon. The selected project will load and open in a
Score window for additional editing and new work.
Score/Project Navigation
Your
score, when opened from the Project
Window, may be navigated by:
•
A
swipe left or right inside the score to go to the next or previous pages
•
A
two-finger pinch to zoom in or out
•
A
quick double-tap in a blank area to zoom in or out at the point tapped
For
more information about editing modes, see Note Editing
Score/Project Operations Bars
Score Window
Operations
are found on the two menu bars at the bottom of this full-screen score window.
•
The
top menu bar, called the Notes Toolbar,
contains note duration choices, note modification icons, the Measure Edit ( ![]() ) icon, and the on-screen keyboard
icon (
) icon, and the on-screen keyboard
icon (![]() )
)
•
The
second menu bar is called the Navigation
Toolbar. It contains navigation controls, the Undo Icon (![]() ), Transport controls, and the
important Navigation Menu (
), Transport controls, and the
important Navigation Menu (![]() ) that, when selected, displays
five icon/buttons for opening the menus for editing part Instruments, Score
properties, and Playback Options, and also to open Help or to return to the
Project Window.
) that, when selected, displays
five icon/buttons for opening the menus for editing part Instruments, Score
properties, and Playback Options, and also to open Help or to return to the
Project Window.
Navigation Controls
The transport controls in the Navigation Toolbar, include arrows for step back and step forward
cursor movement, a Transport set including arrows for Return to the Beginning,
Play, and a Measure Number Indicator box.
Navigation Ruler
Any measure in your entire score may be accessed quickly by
showing the Navigation Ruler. Tap
the Measure Number Indicator found at the right hand side of the transport bar
that shows the current position of your playback cursor. A navigation ruler will appear at the bottom
of the screen that allows you to jump to any measure on the score by dragging
the playback tracker inside the ruler. The measure you select with the tracker
becomes highlighted in light blue, and is marked for the start of playback. Tap
on the Measure Number Indicator again to dismiss the tool.
Adding Sections or Rehearsal Marks
Rehearsal marks can be added easily with the Navigation Ruler open. Touch the playback tracker once quickly, and
a small menu will appear with two buttons: The left-hand button (Play) will
begin playback immediately from the point selected by the tracker. The right hand button, Create Section, will
place a rehearsal letter in the score at the current point set by the tracker.
Deleting Sections or Rehearsal Marks
Rehearsal marks can be deleted quickly as well. With the Navigation Ruler open, navigate to
the Section/Rehearsal letter you wish to delete, and highlight it with a quick
touch. Then, touch the playback tracker once quickly, and a small menu bar will
appear with two buttons: Play (allowing
you to play from the selected Rehearsal Mark), and Remove Section. Touch ‘Remove Section’, and the highlighted
Section/Rehearsal letter will disappear. If your deleted Section/Rehearsal
letter was in between or in front of any other letters, the following letters
will shift alphabetically, to automatically place your rehearsal marks in
consecutive order.
The Score Menu
Score setup and modifications will be found in the Score Menu (![]() ).
This menu window may be accessed by touching the Navigation Menu at the far right of the Transport menu bar (
).
This menu window may be accessed by touching the Navigation Menu at the far right of the Transport menu bar (![]() ), and selecting the Score Menu icon. The following menus are all found in the Score Menu:
), and selecting the Score Menu icon. The following menus are all found in the Score Menu:
Set Time Signature
To enter a Time Signature in your score, open the Score Menu (![]() ).
Select Time Signature/Pickup and a list of common time
signatures may be selected. Use the
Custom Time Signature bars to create your own (if it is logical!) time
signature. A touch outside of this box
on your score will set the beginning time signature to what you have selected.
).
Select Time Signature/Pickup and a list of common time
signatures may be selected. Use the
Custom Time Signature bars to create your own (if it is logical!) time
signature. A touch outside of this box
on your score will set the beginning time signature to what you have selected.
To specify a pickup bar for the very first measure, select Time Signature/Pickup, turn on the switch labeled “Pickup Measure for First Bar”,
then select “Configure Pickup Measure..” to set the pickup bar properties (i.e.
number of beats, note denominator) for the first bar.
Adjusting Score & Part Layout Properties
The scale of the page, which includes measures, chords, and
notes, are adjustable. Open the Score
Menu (![]() ) and select Display Settings. In Display
Settings, the slider labeled 'Score/Staff' adjusts the default sizes of all
score elements proportionally.
) and select Display Settings. In Display
Settings, the slider labeled 'Score/Staff' adjusts the default sizes of all
score elements proportionally.
In the Display
Settings window, sliders for Chord
Symbols, Lyrics, and Text Boxes
allow you to adjust the sizes of the corresponding elements independently from
the default page scale.
Adjusting Page Dimensions
You can set the document page
size, orientation
(portrait/landscape), or margins
under Display Settings > Page Sizes
Under Display Settings
> Defaults.., you can set the default page size and staff size for
your current parts configuration
Set Measure Display Options
You can choose whether you want to display measure/bar
numbers once per every row, every bar, or to disable them. Open the Score Menu (![]() ), and Display Settings. In this submenu, you will see a section labeled Measure Numbers. Measure numbers may be set on every line or
every measure. You may also choose “none” as your default.
), and Display Settings. In this submenu, you will see a section labeled Measure Numbers. Measure numbers may be set on every line or
every measure. You may also choose “none” as your default.
Score View Modes
Scores may be viewed & laid out in one of three
presentations:
1.
Vertical
Scroll Layout (Default after 4.3): provides infinite scroll viewing in the
vertical orientation, and using the specified page width under Display Settings
> Page Sizes
2.
Horizontal
Scroll Layout: provides infinite scrolling in the horizontal orientation
3.
Print
Layout (Default before 4.3): paginates your score as the only
WSIWYG option before exporting to PDF or AirPrint. Its output will be very
similar to Vertical Scroll, however, the only difference being the lack of page
separation using the first option.
To switch to a different View Mode, first open the Score Menu (![]() ), then tap ‘Score View Mode’ to select one of the above options. Vertical
Scroll isn’t recommended on iPad 2/3, nor iPad Mini 1/2, due to performance reasons.
Furthermore, if you select Vertical Scroll, a score page size in inches must
always be specified. This property is permitted to be modified by opening
Display Settings > Page Sizes.
), then tap ‘Score View Mode’ to select one of the above options. Vertical
Scroll isn’t recommended on iPad 2/3, nor iPad Mini 1/2, due to performance reasons.
Furthermore, if you select Vertical Scroll, a score page size in inches must
always be specified. This property is permitted to be modified by opening
Display Settings > Page Sizes.
Concert Pitch
If your project has one or more transposing instruments, you
have the option to place all transposing instruments into Concert Pitch in your
score by opening the Score Menu (![]() ) and turning the Use Concert Pitch switch on. This setting applies to all staves.
) and turning the Use Concert Pitch switch on. This setting applies to all staves.
For easier note entry via On-Screen Piano or MIDI keyboard
onto a transposing staff: a new setting is available in 4.2 so
that you can enter notes as-played (in concert pitch) without ever having to
turn on the above switch. Just look for a separate switch labeled ‘Always Enter
Notes in Concert’, available by opening the Instruments Menu, then selecting
any transposing part.
Full Screen Mode (Complete Bundle)
Scores with many staves, or multiple systems are often
difficult to follow in playback, or to see as full pages. You can view and
audition your score in full screen mode by tapping a discreet icon (![]() ) at the top left corner of the screen.
The Score window will hide all toolbars and menus, save for a small panel with
a Playback arrow (
) at the top left corner of the screen.
The Score window will hide all toolbars and menus, save for a small panel with
a Playback arrow (![]() ) for audition, and a Return button found
at the bottom of the Score Window.
) for audition, and a Return button found
at the bottom of the Score Window.
Staff Groupings
Vertical brackets to the left of the staff are used to
indicate instrument families and organizational groupings.
To specify these score elements, go into Select Mode ![]() )
)
Part Names
You can toggle Part names on/off under Score Menu > Display Settings > Display Part Names. If this
switch is turned on, you will then have the option to display part names for
every line or keep them to the first line only.
Page sizes
Print dimensions may be set to one of several standardized
page sizes, or to a custom size. To select a print dimension, go to the Score Menu (![]() ), touch Display Settings, and then Page
Sizes. The Page Size window
contains common print sizes, custom size options, and a landscape
selection. A choice of any page size
will be reflected in what you see on your score page, and on the printed score.
), touch Display Settings, and then Page
Sizes. The Page Size window
contains common print sizes, custom size options, and a landscape
selection. A choice of any page size
will be reflected in what you see on your score page, and on the printed score.
Score Colors
Background score colors can be set in your score for comfortable
readability. From the Score Menu (![]() ), Select Display Settings, and then Score
Colors. There are 5 background score colors to choose from. As you touch your color selection, the
background of your score will subtlely change to your choice. Click out of the Score Colors window to anywhere on your
score to return to your Score.
), Select Display Settings, and then Score
Colors. There are 5 background score colors to choose from. As you touch your color selection, the
background of your score will subtlely change to your choice. Click out of the Score Colors window to anywhere on your
score to return to your Score.
Notes and Rests
Introduction
Symphony Pro automatically begins on the last screen that was open from your previous session. If you begin on the Projects Menu, select a Project from your choices on screen, or create a new Project. After touching a Project Icon, Symphony Pro takes you to the Score, where you can create and edit your music.
There are multiple ways of creating and editing notes: Placing notes directly on a staff with the Notes Toolbar and touch, through on-screen instrument windows, with MIDI input via an external instrument, various Edit methods, and Delete.
Tools are selected by touching the Expandable Buttons across the Notes Toolbar. The left-hand icon provides two global modes with which to edit:
•
The Pencil (![]() ) mode icon for Note &
Expression Entry. Use Write mode to enter notes into your staff, and perform
fundamental measure modifications.
) mode icon for Note &
Expression Entry. Use Write mode to enter notes into your staff, and perform
fundamental measure modifications.
•
Select (![]() ) mode icon. Use this mode to
modify the properties of highlighted notes & chords by tapping them or
dragging a Note
Selection Area. Copy and Paste procedures are also accomplished in this
mode.
) mode icon. Use this mode to
modify the properties of highlighted notes & chords by tapping them or
dragging a Note
Selection Area. Copy and Paste procedures are also accomplished in this
mode.
To learn more about how to use Expandable Buttons, read the Expandable Buttons page.
Add Notes
Notes are added in the Pencil (![]() ) mode by first selecting the note
type and other desired modifiers found to the right of the Pencil icon. You can
add notes in several ways:
) mode by first selecting the note
type and other desired modifiers found to the right of the Pencil icon. You can
add notes in several ways:
Tap anywhere in a staff:
To add a note to an existing note or chord, tap above or below it. Hold-and-drag on the added note to move it up or down.
Modifying a note’s properties after adding in Write mode
• After adding a note, the note-head will be highlighted
automatically. Tapping the note-head will allow you to edit its properties
using the Note
Selection menu items that appear above it (as shown):
• To bring up these menu items, you can also:
o
Switch to Select mode (![]() ) after adding the note
) after adding the note
o
Tap, hold, and drag over one or more
notes to create a multi-note selection
o
In both cases, a Note Selection
Area is created
• You can also double-tap the note-head to enter Note Adjust mode, which allows you to edit note value and additional properties using a convenient context menu
Precise Insertion
Precise insertion makes it easier to append notes to existing chords, or to insert a note at the beginning or middle of a measure.
In Write mode, tap and hold on any point within a staff to bring up a crosshair to help you place your note. As you move your finger, the note or chord that would be created if you released your finger at that position is played. The crosshair will be colored blue if it would insert a new note. If it is red, the crosshair is over an existing chord. If you release your finger at this position, the note will be appended to this chord.
Using the on-screen piano or fretboard:
Choose the desired instrument by tapping the Instrument (![]() ) icon in the Expandable Button on
the Notes Toolbar. This icon reflects whichever of the four Instrument choices
was last selected, so don’t be surprised if you see on of the other choices:
Guitar (
) icon in the Expandable Button on
the Notes Toolbar. This icon reflects whichever of the four Instrument choices
was last selected, so don’t be surprised if you see on of the other choices:
Guitar (![]() ), Bass (
), Bass ( ![]() ), piano (
), piano (![]() ), or MIDI (
), or MIDI (![]() ):
):
•
Open
the on-screen piano (![]() ). Tap on any note or rest to move the Input Cursor to that
location, or simply tap an empty area at the end of a bar to move the cursor to
that location. If you’re in Select Mode and the cursor selection isn’t empty,
you will see the corresponding piano keys appear in the down (highlighted) position. Play any note(s) on the piano to add
to the selected chord. Tap on any of the down piano keys to remove the
corresponding note from the selected chord. To add a rest using the piano,
select a rest from the toolbar, then play any key on the piano. If the Tie (
). Tap on any note or rest to move the Input Cursor to that
location, or simply tap an empty area at the end of a bar to move the cursor to
that location. If you’re in Select Mode and the cursor selection isn’t empty,
you will see the corresponding piano keys appear in the down (highlighted) position. Play any note(s) on the piano to add
to the selected chord. Tap on any of the down piano keys to remove the
corresponding note from the selected chord. To add a rest using the piano,
select a rest from the toolbar, then play any key on the piano. If the Tie (![]() ) button is selected, a tie will be
added to each note in the selection. The selection will remain on the
note/chord that was changed. You can also use the menu to edit the selected
note or chord's properties.
) button is selected, a tie will be
added to each note in the selection. The selection will remain on the
note/chord that was changed. You can also use the menu to edit the selected
note or chord's properties.
•
Open
the on-screen guitar fretboard (![]() ) in the Instrument icon set. Tap
on any chord or rest to select it with the cursor in Select mode. Selecting a
guitar chord in either standard or tab notation with the fretboard open will
highlight its string and finger positions, which you can edit using the
fretboard. In select mode, every time you tap on the fretboard, a note will be
added to the existing chord. To stop editing the current chord while in Select
mode, tap on the score to the right of the cursor to move the cursor to the
next chord or empty spot. Use the left menu to edit the note type of the
selected note or chord.
) in the Instrument icon set. Tap
on any chord or rest to select it with the cursor in Select mode. Selecting a
guitar chord in either standard or tab notation with the fretboard open will
highlight its string and finger positions, which you can edit using the
fretboard. In select mode, every time you tap on the fretboard, a note will be
added to the existing chord. To stop editing the current chord while in Select
mode, tap on the score to the right of the cursor to move the cursor to the
next chord or empty spot. Use the left menu to edit the note type of the
selected note or chord.
When
editing with either the On-Screen Piano or Fretboard, the logic of Note entry is
identical for either editing mode:
• Use Write
mode (![]() ) for
entering new notes while advancing the cursor:
) for
entering new notes while advancing the cursor:
– Tap on a piano key or fret position to add a new note.
– Tap the delete or undo button to remove notes.
• Use Select
mode (![]() ) for
entering or removing new notes without advancing the cursor:
) for
entering or removing new notes without advancing the cursor:
– Tap a piano key or fret position to add a new note to the
chord selected by the cursor
– If you wish to remove a note/chord beneath the Input Cursor,
highlighted the corresponding piano key to remove the corresponding note
– Removing all notes will convert the selected chord into a
rest
Using QWERTY Keyboard
Refer to the QWERTY Keyboard chapter for instructions on how to enter notes via external device such as Smart Keyboard. Starting Version 5, Symphony Pro makes it convenient to navigate the score, enter notes, and edit note & bar properties without interacting with the screen.
Useful Cursor Gestures
• To reposition the
cursor to a particular note in Select Mode (![]() ) without
accidentally highlighting a score symbol or barline,
just tap directly on its notehead
) without
accidentally highlighting a score symbol or barline,
just tap directly on its notehead
• In either editing mode, you can quickly reposition the
cursor by tapping inside it, then dragging in any direction
• Generate an audio preview of any selected note/chord, by
tapping once inside the cursor in Select Mode (![]() ) without dragging
) without dragging
The Note Selection Area
A Note Selection (illustrated) consists of one or more highlighted notes in
Select mode (![]() ), as
well as Pencil mode (
), as
well as Pencil mode (![]() ) for working with a single
highlighted note.
) for working with a single
highlighted note.
Creating
• Long-press a note-head in either mode
• Long press a score location, then drag a rectangle in any direction. You can also drag over multiple systems to highlight more than one line of notes
•
Also, you can tap on a newly added note in
Pencil (![]() ) mode to show the same menu items
below
) mode to show the same menu items
below
Editing Tasks
Selected notes show up in blue. Once a Note Selection Area is created, menu items will appear to transpose, beam the notes together, delete, or to convert to a Region Selection for copying and pasting (illustrated).
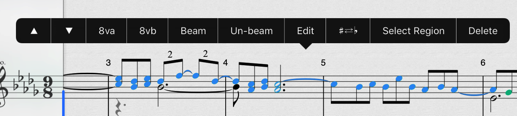
Note Selection Area highlighted in Blue. Not to be confused with a Region Selection.
• Once one or more notes have been selected, use the up/down arrows or 8va/8vb toolbar icons above the selection box to transpose the notes by a semitone or an octave, respectively. Alternatively, drag the selection box directly to transpose the notes in half-steps by default.
•
To toggle note/rest for one or more notes/rests
at the same time, first create a note selection and switch the Notes Toolbar to
any rest symbol if a note symbol is visible, or to any rest symbol otherwise.
•
Similarly,
activate any of the following Notes Toolbar Expandable Buttons in Select mode (![]() ) to apply the corresponding
property to the selection.
) to apply the corresponding
property to the selection.
o
For
example, tapping the accidental icon will apply or un-apply that accidental
from the current note selection
![]()
Notes Toolbar Items Toggle-able in Select mode
Note Adjust Menu
Double-tapping one or more highlighted notes in blue (see Note Selection Area)
in any mode will show the Note Adjust Menu, allowing quick modification of note
value, augmentation dot, and tie properties. You can also toggle/note rest by
choosing the note value that's already highlighted
Note Adjust Menu items illustrated.
The Note Adjust Menu provides
quick access to many note editing features with just a
few taps. The menu can be accessed from
either the Pencil (![]() )
or the Select Mode (
)
or the Select Mode (![]() ) while working in the Score
window. First tap the note to be edited. The note will be shown in orange. An
initial menu will pop up for stepwise pitch alteration, enharmonic equivalent
change, opening the Note Properties menu, and/or deletion of your selection(s).
) while working in the Score
window. First tap the note to be edited. The note will be shown in orange. An
initial menu will pop up for stepwise pitch alteration, enharmonic equivalent
change, opening the Note Properties menu, and/or deletion of your selection(s).
Now tap the box surrounding the note a second time, and the Note Adjust menu will pop up. Arrows on either side of this menu will return you to the previous menu (left arrow), or to more Note Adjust choices (right arrow).
From the Note Adjust Menu, you can perform one or more the following editing operations depending on whether they can be applied to the note selection:
• Change the note value of your selection
• Toggle between a note and a rest
• Add or remove a tie
• Repeat the note
• Subdivide the note
• Diminish the Rhythm/Augment the Rhythm
• Shorten the note (will add rests to fill the space of the original note), and depending on your modifications, this menu will also allow you to merge or shorten the result of your note adjustment.
Voices/Layers
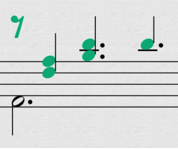
The multi-voice staff feature allows combining different note values in the same staff (example shown). For instructions on how to use this feature, refer to the Voices/Layers help chapter.
Auto-Fill Rests
In 4.0, rests are automatically padded at the end of a measure you edit,
when adding a new note or editing an existing note inside the measure. You can
turn off this behavior from the Settings app. Go to Home Screen > Settings
> Symphony Pro, then under Usage Preferences, turn off the switch labeled
“Auto-Fill Rests”.
Tuplets
There are two convenient ways to add tuplets to your music:
•
The first way to add tuplets
is by using Select Mode (![]() ) to
select (highlight) notes. Tap on the Expandable Button for Tuplets
(
) to
select (highlight) notes. Tap on the Expandable Button for Tuplets
(![]() ) to turn any number of selected
notes into a tuplet. You can change the ratio of this
tuplet by tapping on this Expandable Button and
performing a slide gesture to a different ratio.
) to turn any number of selected
notes into a tuplet. You can change the ratio of this
tuplet by tapping on this Expandable Button and
performing a slide gesture to a different ratio.
•
In Write mode (![]() ), you can add tuplets
in automatically-formed groups after selecting the tuplets
icon.
), you can add tuplets
in automatically-formed groups after selecting the tuplets
icon.
If you want to create a tuplet with a custom fraction, refer to the Special Notes > Custom Tuplets section.
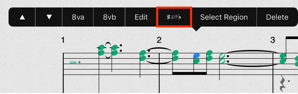
Accidentals
In Select mode, you can add accidentals to a selected note with the sharp/flat/natural expandable button in the note entry menu bar. Select the accidental you want from the sliding accidental button, and the selection will be applied immediately. To change the accidental once more while the note remains selected, slide the accidental choices to the new choice. Double accidentals are also available with the use of the slide gesture. To remove an accidental from a selected note, simply deselect the expandable button.
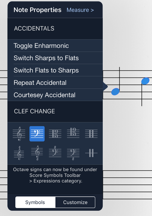
Courtesy Accidentals as well as enharmonic modifications are accessed by selecting the desired note to be changed (in Select mode), touching the Edit button in the popup menu, and selecting Courtesy Accidental in the Note Properties choices (illustrated below). Parentheses will be placed around the selected note.
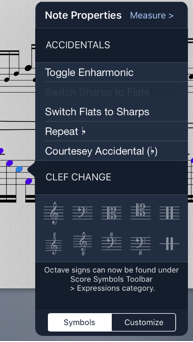
Choose ‘Edit‘ from the Note Selection context items to show the Note Properties dialog
Choose the above menu item to toggle a selected note enharmonic in either editing mode.
Undo and Redo
To undo an edit or operation, tap the Undo (![]() ) button. To redo an edit, tap the
Undo icon again, but hold it a bit longer.
The Redo button will popup, and may be tapped
once or several times to redo your previous editing operations. Tap outside of
the Redo button to return to score construction.
) button. To redo an edit, tap the
Undo icon again, but hold it a bit longer.
The Redo button will popup, and may be tapped
once or several times to redo your previous editing operations. Tap outside of
the Redo button to return to score construction.
Using the Scroll Bar to Change Octave for Piano and Fretboard
On both the piano and fretboard, there is a semi-transparent scrollbar that allows you to play at a higher or lower octave, by touching the center of the bar, and moving your finger left or right to the desired octave. With the piano, this scrollbar can also resize the piano keys.
Play Instruments Without Editing
You can play one of the on-screen instruments without editing the score. To do this, deselect the currently selected mode (Select or Pencil) in the Notes Toolbar and play the instrument as normal. If the instrument is not showing, open it by selecting the Piano or Fretboard icon.
To make best use of the instrument, turn off Multitasking Gestures in the Settings app. This will allow you to play with four fingers without triggering a gesture.
The Note Properties Context Menu
Accessing the Note Properties Context Menu
Symphony Pro provides advanced options for customizing stems, beams, enharmonic spellings, applying mid-measure clef changes, and more. These options can be found by opening Note Properties on one or more highlighted notes:
•
To open the Edit Notes menu, first create a note
selection Select Mode (![]() ),
or long-press on a note-head in either mode; then choose the Edit menu item (as
illustrated). Alternatively, press Control-N if a QWERTY keyboard
is connected.
),
or long-press on a note-head in either mode; then choose the Edit menu item (as
illustrated). Alternatively, press Control-N if a QWERTY keyboard
is connected.
• A context menu like the following should appear next:
Add or Remove Mid-Measure Clef Changes
In Select mode, select a note or group of notes and the Note modification sub-menu will appear. Tap the Edit menu item to open the Note Properties dialog. Under Symbols at the bottom of the dialog, you can add a clef change directly before the current note. To remove the clef, tap the highlighted clef under this menu to un-highlight it.
Stem Directions, Beams, and Cross-Staff Notation
In Select mode, select a note or group of notes, and choose Edit to bring up the Note Properties dialog. Under the Customize section at the bottom (illustrated), you can set a user-defined stem direction of a note, chord, or beam group, or specify how beams are grouped at the particular note or rest. Deselect the check marked option to disable a change:
![]()
Stem Direction & Length
Stem and Beam Control Points
(a) A direct way to flip the stem of a given note by selecting the tip of the stem in Select mode, which will also become adjustable in length. Flicking the handle vertically will invert the direction of the stem.
(b) Similar control points for beams can be shown by tapping on either end of the beam, which can then be dragged vertically to adjust stem length or direction.
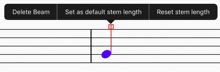
Specifying Default Stem Lengths (Starting 5.2)
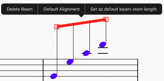
• To adjust the default length of normal stems, first select the endpoint as instructed in step (a) above, then choose the ‘Set as default stem length’ menu item.
• To adjust the default length of beamed stems, select the beam as instructed in step (b) above, then choose ‘Set as default beam-stem length’.
• Both the above settings will affect the entire project. You can reset either to the application-default value using the ‘Reset stem length’ menu item that appears when performing (a) or (b), if applicable.
Cross-Staff Notation
When specifying a cross staff beam, select the notes that you want to cross above or below the original staff, then navigate under Note Properties > Customize > Cross Staff Beaming (as illustrated):
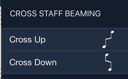
Currently, if you are specifying a cross staff indication for a chord, the entire chord will cross over, regardless of the individual notes you have selected
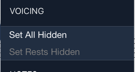
Making Notes or Rests Invisible for Printing
You can set notes or rests invisible to hide them when exporting a printable document. This is primarily useful when creating multi-layer compositions with forward rests. To set a note or rest invisible, select one or more notes or rest(s). Choose Edit to bring up the Note Properties dialog. Under the Customize rectangle, tap "Set All Hidden" or “Set Rests Hidden”. Tap a check-marked option again to un-toggle it:
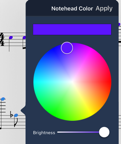
Customizable Note-head Colors
Notehead colors of selected notes can also be changed under Note Properties. Then choose Customize at bottom > Notes > Notehead Colors (illustrated): As with other modifications, you can select one or multiple applicable notes. New color choices will appear on exit:
Additional Preferences
Note Entry & Editing Preferences in the iPad Home Screen
Several options for application-wide note preferences are available via iPad Home Screen > Settings icon > Symphony Pro, illustrated below:
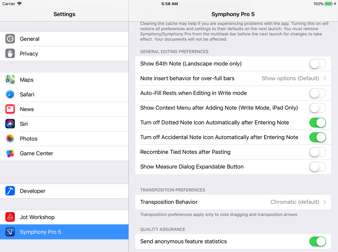
From within your iPad settings list, continue down through the individual application icons until you find the Symphony Pro icon. Touch the SP icon, and several Usage Preferences will be found in the right-hand screen, including:
• Show 64th Notes in Landscape Mode only switch
• Transposition Behavior choices, which allow you to customize how notes are transposed when dragging a selection vertically, or when using the up/down transpose arrows from the menu items that appear above a note selection
• Note Insert Behavior for over-full bars (slide and select between Always add, Always shift, or Show Options (Default)
• Auto-Fill Rests to fill the measure when adding notes or editing note values
• Choose whether the Dotted Note button and Accidental button should automatically deselect upon entering a note
• Enable or disable 64th notes as a palette icon from the Notes Toolbar
Resetting the Application Cache & Settings
The above Home screen menu also provides an option to reset your application-wide preferences & metadata to their defaults, by turning on the switch at the top, labeled Reset Cache and Application Settings Data. Doing so is recommended if you encounter crashing when launching the app, or if you simply want to revert application-wide settings that were made under the above menu and within SP.
Special Notes and Symbols
For each of the following, look within the Notes Toolbar:
![]()
Grace Notes and
Cues
Grace notes and cues can be inserted just like normal notes. First tap on
the Expandable Button for Symbols (![]() ). If you want to
select a cue, select the appropriate option (
). If you want to
select a cue, select the appropriate option (![]() )
after expanding the button.
)
after expanding the button.
To insert a grace note or cue, make
sure that you are in Pencil
(![]() )
mode, and that one of the Note buttons (instead of a Rest button) is selected.
For grace notes, if the duration of the note that you select is longer than or
equal to a quarter note, an appoggiatura will be added. Otherwise an
acciaccatura will be added. Tap and hold on the score to bring up a guide to
help you place the grace note. Move your finger until the guide is blue, and
then release to add a new grace note. Multiple grace notes or chords can be
added to a single chord.
)
mode, and that one of the Note buttons (instead of a Rest button) is selected.
For grace notes, if the duration of the note that you select is longer than or
equal to a quarter note, an appoggiatura will be added. Otherwise an
acciaccatura will be added. Tap and hold on the score to bring up a guide to
help you place the grace note. Move your finger until the guide is blue, and
then release to add a new grace note. Multiple grace notes or chords can be
added to a single chord.
Similes
To indicate that the previous one or two measure(s) should be repeated, you can insert a simile mark.
To choose a simile, tap on the Expandable Button for Notehead
Symbols (![]() ) and perform a slide gesture to select one of
the last two elements.
) and perform a slide gesture to select one of
the last two elements.
To insert a simile, tap the Insert icon on the navigation bar. Insert a one-bar simile anywhere in a measure to add it to the middle of that measure. Insert a two-bar simile anywhere in a measure to add it in-between that measure and the next one. Symphony Pro now supports playback of similes.
Noteheads
To insert a notehead, go into Insert mode, then
tap on the Expandable Button for Notehead Symbols (![]() ) and perform a slide gesture. This button
opens a menu that allows you to choose from eight different symbols, such as X,
Circle-X, Triangle, or Diamond. While the Symbol button is selected, any notes
or chords that you add will be given the selected notehead.
) and perform a slide gesture. This button
opens a menu that allows you to choose from eight different symbols, such as X,
Circle-X, Triangle, or Diamond. While the Symbol button is selected, any notes
or chords that you add will be given the selected notehead.
To change the noteheads of existing notes, first go into Select mode and
select one note or a group of notes. Then tap once on the Symbol button to
apply your selection to all selected notes. To change all selected notes to a
different notehead, tap Notehead
Symbols (![]() ) and perform a slide gesture to select
another symbol.
) and perform a slide gesture to select
another symbol.
Certain instruments, such as the Drum Kit, will playback differently depending on the noteheads used.
Slash Notation
You can add both stemmed and stemless slashes to your compositions to indicate rhythms. Both are located at the bottom of the Symbol dialog. See the Noteheads section, above, for more information on how to insert and edit slashes. Slashes can be used interchangeably with other notes, but both types of slashes are ignored during playback.
Double and
Triple-Dotted Notes
First go into Select (![]() ) mode and then double tap
on any notehead in the active voice to bring up the Note Properties dialog.
Under the Dotted Notes section, tap the Double or Triple button. If the new
note will fit in its measure, the button will now be checked and the note will
be changed. Tap outside of the Note Properties dialog to close it.
) mode and then double tap
on any notehead in the active voice to bring up the Note Properties dialog.
Under the Dotted Notes section, tap the Double or Triple button. If the new
note will fit in its measure, the button will now be checked and the note will
be changed. Tap outside of the Note Properties dialog to close it.
Custom Tuplets
Version 4 allows you to specify any ratio for a tuplet
in Select mode (![]() ). As one example, you can
specify a 7:4 quarter note tuplet by doing the following:
). As one example, you can
specify a 7:4 quarter note tuplet by doing the following:
• Enter 7 normal eighth notes into a bar
• In order to make all of these quarter notes, first highlight them by dragging over the entire bar (with a rectangle select)
• From the Notes Toolbar, select the quarter note icon to modify the selection accordingly (this will cause the bar to be over-full)
• Tap once or twice inside the note selection box until it’s highlighted in red
• Choose the menu item labeled "Tuplet.." at the top
• The Define Custom Tuplet Ratios_ dialog (illustrated below) will allow you to specify the selection to stand in for 4 notes, each with a quarter note duration
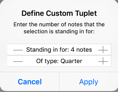
Note, however, that the above dialog only modifies the duration of the tuplet, and not the displayed note values. As is standard practice, the first number in the displayed ratio accounts for the number of notes that are in the tuplet, while the second number indicates how many normal notes the tuplet is substituting for.
Percussion-Specific Accommodations
_ Version 5 introduces an option to lock note stems to match the Layer stem direction setting for a percussion staff. Open the Instruments menu and open Instrument Properties corresponding to the staff. Turn on the switch labeled Always Follow Layer Stem Direction. This will force stem directions to point downward for the lower voice and vice-versa for the upper voice, regardless of whether the bar is a multi-voice staff.
Dynamics, Articulations, and Text
Dynamics, Articulations, Line Indications, tempo marks, expressions, and
other score conventions are accessed by a button icon in the black Note Toolbar that runs across the
screen below your score. The secondicon from the
right in this bar will contain the Score
Symbols Expandable Button (illustrated below). When collapsed, this button
displays the last used category for access to these tools. Dynamics ![]() )
)![]() ),
Articulations (
),
Articulations (![]() ), Guitar Techniques (
), Guitar Techniques ( ![]() ), and Text
(
), and Text
( ![]() ) are the five icons you can choose
from by tapping the current icon in this box, and selecting the tool you wish
to use. The Text icon also includes chord symbols, lyrics, and text boxes.
) are the five icons you can choose
from by tapping the current icon in this box, and selecting the tool you wish
to use. The Text icon also includes chord symbols, lyrics, and text boxes.
Before you Start
• For all of the following tasks, first open the Score Symbols toolbar by activating the expandable button shown in green:

Score
Symbols Toolbar shown at very top. Score Symbols Expandable Button shown in
green.
• Pressing down on the Score Symbols expandable button will reveal the available toolbar categories as shown below:
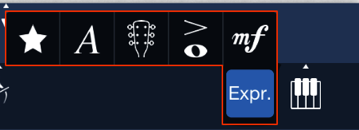
Score
Symbols Expandable Button with 6 of the available toolbar categories (iPad).
Dynamics, Expressions, and Articulations
To add dynamics, expressions, or articulations at any place in your score,
simply select the appropriate icon (![]() ), (
), (![]() ),
(
),
(![]() ), and tap on any note or chord.
Almost all articulations, dynamics, and tempo changes will have the appropriate
effect in playback.
), and tap on any note or chord.
Almost all articulations, dynamics, and tempo changes will have the appropriate
effect in playback.
A special section for Guitar Techniques (![]() ) has been added for characteristic
guitar performance techniques. Playback
will include the appropriate effect addition if the tempo permits.
) has been added for characteristic
guitar performance techniques. Playback
will include the appropriate effect addition if the tempo permits.
Slurs / Phrase Marks
Select the Expressions Menu (![]() ).
To add slurs, select the Slur (
).
To add slurs, select the Slur (![]() ) tool and then tap a note where
the slur should begin. Drag the first handle to adjust its position, the middle
handles to adjust its shape, and the last handle to adjust its span.
) tool and then tap a note where
the slur should begin. Drag the first handle to adjust its position, the middle
handles to adjust its shape, and the last handle to adjust its span.
Tempo Changes / Metronome Marks
To place a new tempo changes/metronome mark, first select the appropriate toolbar category (Expr., as shown below), then choose the quarter note with equal sign. You can then modify either side of the equation (i.e. note value or tempo value) by selecting the symbol in Select mode and choosing the Edit menu item.
![]()
Chord Symbols
Open the Text Menu (![]() ). Tap the Chord Symbol (
). Tap the Chord Symbol (![]() ) icon and then tap on any area
inside a measure where you wish to add symbols. A keyboard will show, along
with an editing cursor above the staff. Chord symbols are entered by typing
them in plain text. With the keyboard open, tap the "Next" key to
move to the next available space in the current measure. Tap on another measure
to set the cursor to that measure. To finish editing, close the keyboard.
) icon and then tap on any area
inside a measure where you wish to add symbols. A keyboard will show, along
with an editing cursor above the staff. Chord symbols are entered by typing
them in plain text. With the keyboard open, tap the "Next" key to
move to the next available space in the current measure. Tap on another measure
to set the cursor to that measure. To finish editing, close the keyboard.
Upon opening the keyboard, an additional toolbar will show, allowing you to enter symbols for accidentals and special chord modifiers. To specify a superscript, enter the ^ symbol. After you are done editing, the symbol will be removed, and the superscript will be formatted.
If you later transpose a measure, then each chord symbol inside of it will be transposed into the new key as well. To transpose a measure, simply change the key at that measure. A dialog will come up afterwards asking you how you want to transpose the notes. For more information, see Time and Key Signatures in the Tracks page.
Lyrics
Open the Text Menu (![]() ). With any note selected, tap the
Lyrics (
). With any note selected, tap the
Lyrics (![]() ) icon, and an expanded QWERTY
on-screen keyboard will appear. An
editing cursor will appear below the selected note, and you can add your lyrics
from that point. To more to the next
note, touch the Space bar on the keyboard, or tap the Next key on the
right. To span a word across multiple
notes, insert a hyphen character at the end of each syllable. The hyphen will
not appear until after the following syllable is entered.
) icon, and an expanded QWERTY
on-screen keyboard will appear. An
editing cursor will appear below the selected note, and you can add your lyrics
from that point. To more to the next
note, touch the Space bar on the keyboard, or tap the Next key on the
right. To span a word across multiple
notes, insert a hyphen character at the end of each syllable. The hyphen will
not appear until after the following syllable is entered.
To add multi-verse lyrics, use buttons L2 to L6 corresponding to verses 2 through 6.
Fingerings
Open the Text Menu (![]() ). With any note selected, tap the
Fingering (
). With any note selected, tap the
Fingering (![]() )
icon and then tap on a chord or note where you wish to add fingerings. A keyboard
will show, along with an editing cursor above or below the note. If you specify
a multi-digit number, each digit will be formatted (stacked) vertically.
)
icon and then tap on a chord or note where you wish to add fingerings. A keyboard
will show, along with an editing cursor above or below the note. If you specify
a multi-digit number, each digit will be formatted (stacked) vertically.
With the keyboard open, tap the Next key to move on to the next note or chord in the current track and voice. To finish editing, close the keyboard.
Textboxes
Open the Text Menu (![]() ). Tap the Textbox (
). Tap the Textbox (![]() ) icon in the toolbar and then tap
anywhere on the score to create a new text box. You can then tap inside the box
to begin editing. The text box can be resized by using the blue handles. If you
tap anywhere else inside the text box, you can move it by dragging. The Textbox
will automatically maintain its position relative to the closest bar/measure.
Tap on the red X in the top-right corner of the text box to delete it.
) icon in the toolbar and then tap
anywhere on the score to create a new text box. You can then tap inside the box
to begin editing. The text box can be resized by using the blue handles. If you
tap anywhere else inside the text box, you can move it by dragging. The Textbox
will automatically maintain its position relative to the closest bar/measure.
Tap on the red X in the top-right corner of the text box to delete it.
• While editing, you can resize the text area horizontally or vertically by dragging a corner; to resize at a later point, highlight the textbox first by tapping the text frame directly.
• To finish editing, tap anywhere on the score outside of the text area.
Other tips
• Many commonly used words for musical direction (e.g. adagio, coda, capo, fine) will be will recognized and automatically italicized if they are entered into a text box.
• You can double-tap the textbox to highlight the element. This will show a variety of customization context options (illustrated). They allow such actions as customizing the typeface to a bold font, as well as customizing the size and typeface:

Octave Changes
To add symbols like 8va, 8vb, 15ma, or 15mb
switch to Expressions (![]() ),
then look for the 8va expandable button.
),
then look for the 8va expandable button.
Moving or Deleting Unwanted Symbols
•
When symbols (articulations, dynamics, etc.)
applied to the score are incorrect, or need to be moved to the proper place,
simply tap on the symbol while in Select mode (![]() ).
A single tap will highlight the symbol in Blue. It can then be moved to a correct position
with a second touch/move operation.
).
A single tap will highlight the symbol in Blue. It can then be moved to a correct position
with a second touch/move operation.
• If a symbol needs to be deleted, tap it a second time, and it will highlight in red. A popup box will appear with a delete symbol. Tap on the delete box to remove the unwanted symbol.
Lyrics can be removed using the same actions. Tap on the word/syllable you wish to change while in Select mode. A popup box with Edit or Delete choices will appear. The selected word or words may be Deleted or Edited to the desired change.
Adding or Deleting Multiple Symbols
An expression/symbol may be added to multiple notes by Selecting them via
Notes Edit Selection. In Select mode (![]() ), tap and drag across the
multiple notes that include the symbols to be modified. The shaded Notes Edit box should appear
around your selected notes when you end your drag. Now tap on the articulation or symbol you
wish to have added to the blue selected notes.
), tap and drag across the
multiple notes that include the symbols to be modified. The shaded Notes Edit box should appear
around your selected notes when you end your drag. Now tap on the articulation or symbol you
wish to have added to the blue selected notes.
Symbols may also be Deleted by selecting notes with articulations attached via the Notes Edit Selection. A black Deletion box will appear. Touching this box will delete all articulations in the selected area.
Note that not all symbols can be added to the space inside a measure.
Convenient Shortcuts in Version 5
•
Score Symbol Autocomplete
Shortcuts
allow you to add dynamics, expressions, even articulations with a single tap.
In Write mode, long-press a score location where you’d like to place a symbol.
You can partially type in the first few letters of the desired expression, and
a dropdown will show you the closest matching element. Examples include “cresc.”, “mp”, “metronome mark”,
or even “lyric”.
• Favorited Score Symbols allow you to include individual Score Symbols toolbar items under the new Favorites category for quicker access to commonly used articulations, dynamics, expressions, and text
- Long press any toolbar item and tap the “Favorite” menu item to add it to this category
-
To view your favorited items, switch the Score
Symbols Expandable Button (![]() ) to the Star icon (
) to the Star icon (![]() )
)
- To remove an item from favorites, long-press a toolbar item under this category, then tap ‘Unfavorite’
Cut, Copy and Paste
Cut and Copy
The Region Selection Area (illustrated below) allows you to cut, copy, and paste a region of notes. This tool is different from the Note Selection Area, which highlights individual notes, and is designated towards transposing/editing a note selection,
To Cut or Copy a selection area,
choose the Select mode (![]() ) mode (left-most icon in the Notes toolbar)
) mode (left-most icon in the Notes toolbar)
. Bring up the Region Selection Area (illustrated) by either of the following:
- Tap-and-hold (i.e. Long Press) the location in the score where you’d like to start the copy or cut operation. The nearest note or chord in the measure will automatically be selected.
- If the Input Cursor is showing, tap once inside the cursor, then choose the ‘Select Region’ menu item
- If you have a QWERTY keyboard connected, press Shift + the left or right arrow with either MIDI or On-Screen Piano/Fretboard enabled. This is the default shortcut to summon the rectangle starting from the cursor location. Press ; to dismiss the selection.
Ø For more details about hardware keyboard, click here to navigate to the dedicated help chapter.

Region Selection Area shown. Not to be confused with a Note Selection Area.
. Two handles will appear with a light-blue selection area between them. Use the handles to move or resize the selection.
. When you finish making your selection, and remove your finger from the screen: a menu bar will appear with a number of editing choices.
. Tap "Cut", "Copy", or select from several more choices (see below) dependent upon the number of layers (voices) you have selected.
. When you have selected a measure or passage with multiple layers, the available menu items will extend across your screen. Touch the right arrow on the Menu bar to see all available options.
. Cut and Copy will save all selected layers to the clipboard or delete all layers of a selected area.
Tip: In Select mode, tapping quickly on any note will bring up the Select button at the point of selection. Tapping Select Region is a quick way to show the cut/copy/paste menu items at the noteճ location.
Paste
To Paste a selection area, go into Select mode and long-press the location in a measure where you want to paste. Tap "Paste" to insert the contents of the clipboard directly before the selected area.
Editing the Selection
Tapping "Select Notes" on the Region Select tooltip will highlight all of the notes under the selection area to create a multi-note selection. This selection can be used for transposing and applying notational changes. For more information about multi-note selections, see the "Note Properties" section in the Notes and Rests menu.
Tapping Edit Measures when multiple bars have been selected will bring up
the Measure Dialog Window where three more editing choices can be found. Bars
contain bar line choices, measure additions or subtractions, rest additions, and
staff layout changes can be accessed for all of the current selection. The
Time/Key box accesses meter and key choices for the selected area. A third
selection box enables Clef changes.
Multi-Track Copy
If you are selecting more than one row of staff systems, the selection area will only highlight the first staff/track. To select all staves, tap "Select All Staves" from the Region Select popup menu. Alternately, you can slide the right or left blue dots across as many staves or measures you wish to include.
Swap Voices/Layers
The
Version 5 release supports the swapping of voices, allowing you to switch the
notes of any two layers. By the same logic, this option allows you to move
notes to a new/empty layer, which is easier than having to cut and paste manually.
Paste to Current Layer
To Paste copied notes from a single layer from your Clipboard, go into Select mode, tap-and-hold on the location in a measure where you want to paste, and tap "Paste to Current Layer" to insert the contents of the clipboard directly before the selected area. Only the layer you have copied from the Copy Current Layer will appear at the insertion point.
Select Notes in Current Layer
If you wish to edit the notes of your current layer only, tapping on Select Notes in Current Layer will bring up the Note Selection Menu that includes options for incrementing or decrementing your selection by a half step, 8va or 8vb transposition, Beam or Un-beam choices, advanced Editing choices, enharmonic equivalent change, and deletion.
Select Bar/Select to End
Tapping on either of these two choices after your initial tap-and-hold will extend the selection area to include the entire current bar, or all measures to the end of your music.
When you choose Select To End, the Menu will also include a new option called Ҽb style='mso-bidi-font-weight:normal'>Select All StavesӠwhich will allow all staves in a system to be selected to the end for further editing.
Edit Part/Instrument Groups
Selection of Edit Part/Instrument Groups in the menu bar will bring up three new choices for construction or deletion of bracket(s) or brace(s) to the selected staff groups or staves. A single bracket or brace will be created at the left of your system, dependent upon how many staves have been selected. If you wish to bracket an entire system of multiple staves, choose the Select All Staves menu item.
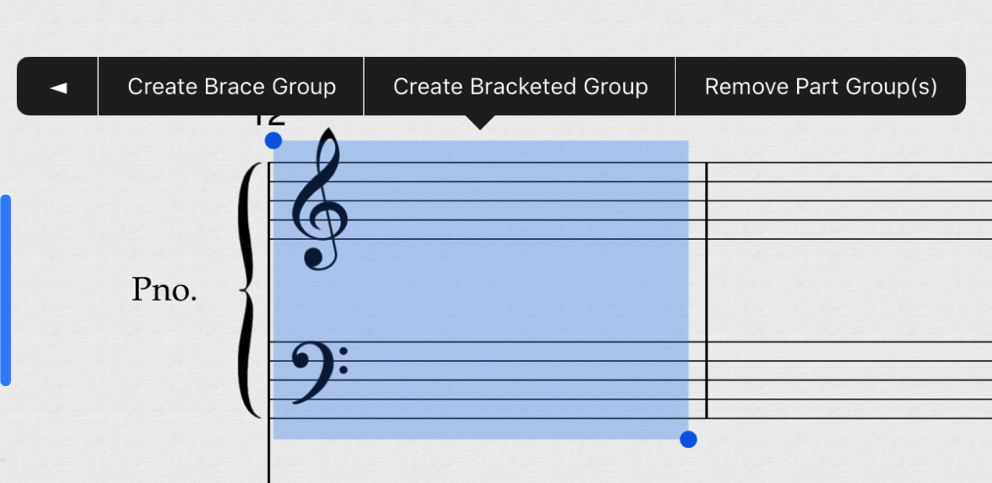
Extending a Bar
Selection using the QWERTY Keyboard or Left/Right Arrow Buttons
Alternatively, you can use a QWERTY shortcut to show the Region Selection Area from the Input Cursor, and then extend the rectangle left or right. First switch to Select mode, and make sure the Input Cursor is open via on On-Screen Instrument or MIDI Instrument selected. Pressing Shift + the Left or Right arrow key is the default key combination to expand the rectangle horizontally. This will work in step-by-step increments by extending the selection to one adjacent note, chord, or measure at a time.
If you donմ have a QWERTY keyboard, you are still able to extend the Region Selection Area incrementally, provided that itճ already open: Just tap the left or right arrow icon within the Navigation Toolbar.
Selecting an Entire Part / Editing
Notes from a Region Selection
Whereas a
Region Selection is normally designated to select entire bars and staves for
editing, and canմ edit
individual note properties on its own, you can highlight the individual notes
using a multi or partial-bar selection, just as you would by dragging a
Note-Selection area by a tap-hold-drag gesture. In the example scenario below,
we go over how to highlight and transpose all of the notes in an entire part:
. Make sure you are in Select Mode, then locate the bar where the music you wish to transpose or edit begins
. Bring up the Region Selection Area this start location via one of two options:
. If you have moved the Input Cursor to the start location, tap directly on the cursor, then activate the Region Select option; (note: in a VO context, you must instead double-tap the Input Cursor to bring up the above option)
. Long press on the start location for a few seconds; this is a quick gesture to show the Rectangle
. Within the menu items that appear above the Region Select Rectangle, find the option labeled ԓelect to Endծ It may be necessary to double tap on the More Options right arrow. The resulting selection area should look like the following illustration.
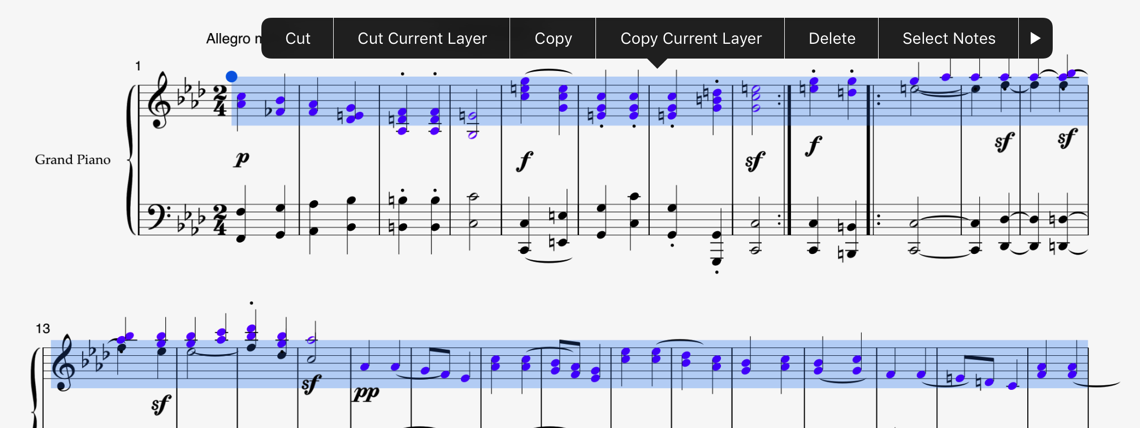
. Choose the option labeled ԓelect Notes in Current Layerՠto show Note Selection Area. You can now drag one of the highlighted notes vertically to transpose, or use the up/down arrows. You can later switch back to a Region Selection by choosing Select Region
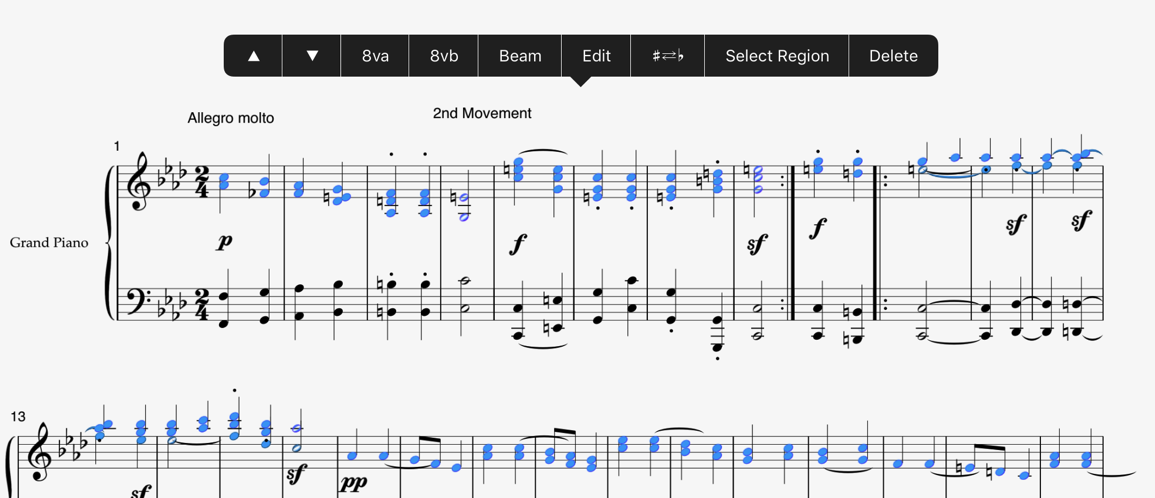
. Press Option Shift Up Arrow if youղe using a QWERTY keyboard to edit, or use the up/down transpose items that appear above the Note Selection Area
Measures
Measure Dialog Window Access
The
Measure Dialog Window can be
accessed three ways. First activate Select mode (![]() ):
):
•
Tap
the measure you wish to edit with two
fingers: The Measure Dialog Window
will open.
•
Create
a Region
Selection Area, then choose the Edit Measures menu item
•
Tap
a bar line to the left of the measure you wish to edit, and a blue square will
appear on the chosen bar line. Then tap the blue square, and a small ‘Edit Bar’ option will appear. Tapping
Edit will bring up the Measure Dialog Window
Measure Dialog Window Features
When
the Measure Dialog window is open, three sets of options are available: Bars,
Time/Key, and Clef. Select one of the three boxes at the bottom Menu Bar
appropriate to the modifications needed:
Time Signature, Key Signature, and Transposition
To
add a time or key signature change to the beginning of the current measure,
first tap the Time/Key button at the bottom menu bar:
![]()
From this menu, you can change the time and/or
key from your selection point the end of the score, or only apply it to the
current measure.
•
Both
key changes and time are modifiable by touching the dialog window at the
example point, and scrolling up or down in the window to select the proper
signature. When you are ready to apply the change, dismiss the dialog by
tapping outside of it.
•
Custom
Time is set by using the minus or plus signs on either side of the current
meter indication.
The
selected changes can be applied to Selected Measures only, or to Subsequent
Measures. To apply changes, close the menu or choose ‘Apply selected time
signature’.
Pickup/Anacrusis
A
Pickup/Anacrusis measure can be
specified (also referred to as an upbeat), by checking the Pickup (Anacrusis) box at the bottom of this menu. Make sure you
have "Bars" selected at the bottom menubar (illustrated). To apply
changes, close the menu or choose ‘Apply selected time signature’.
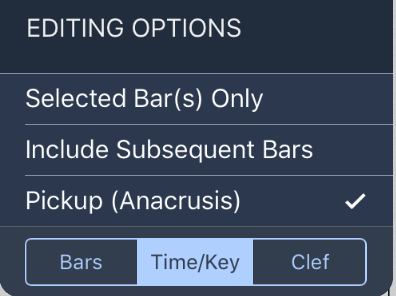
Transposing Notes without Changing Key
•
Under
Measure Dialog > Time/Key, tap Transpose Notes & Chord Symbols.
•
Create
a Note Selection Area, then drag one or more of the highlighted notes
vertically
Clef Changes
To
add a clef change to the beginning of the selected measure, tap the Clef button
at the bottom menu bar of the Measure Dialog:
![]()
A new window will open with clef choices, and
how the clef change should be applied.
To
specify a mid-measure clef change, you will need to select a note first, then
use the Note Properties menu. For instructions, see Mid-Measure
Clef Changes in the Notes chapter.
Bars Dialog
For
each of the following, choose Bars
from the bottom menu bar of the Measure Dialog, as illustrated:
Repeats, Alternate Endings, and Bar Lines
The Bars submenu has several
important choices to modify both the selected measure, and the Staff Layout
itself. Select the Bars button to bring up the Bars/Measures Dialog:
When
the left/right repeat icon has been touched in the Measure Dialog for the
selected measure/measures, the Repeat
Options box will light, and you can select a desired number of repeats to
the right of the # Repeated Sections Dialog (Complete Package). Once multiple
repeats of the measure have been chosen, tap Done, and the number of repeats
will be printed just above the ending Repeat bar.
Add Measures
With
Bars chosen at the bottom of the dialog,
tap Add Measures to insert new measures before or after the current one. Enter
however many measures you want, choose where to insert these measures, and then
tap Done.
Delete Measures
To
delete one or more measures, first choose Bars at the bottom of the Dialog,
then Delete Measures. Enter the number of measures that you want to delete,
beginning at the current one, and then tap Done. To delete all measures from
the current one until the end of the score, tap Delete to End.
Fill with rests
Fills
the selected measure with rests without the need to select the rests in the
note palette.
Staff Layout
Selection of Staff Layout opens a dialog box with
global choices:
•
Bars
per line (shown below). Selection includes Automatic, and measures per line
selected by a touch on the visible number, sweeping vertically to set the
number desired. After pressing done, the edit will apply only to the current
line and below. As such, the value of this property can be overridden for the
any given line, by reopening the Measure Dialog, returning to the Bars Per Line
submenu on the first bar of that line, and setting a different value.
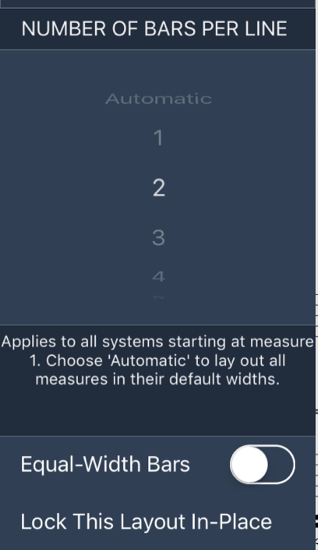
•
Create
Section. Selecting 'Section/Rehearsal Mark' automatically places a rehearsal
letter at the selected measure. This can
be removed by selecting the
•
System
Break. selection will end a system at
the selected measure.
Tempo Changes /
Metronome Marks
For steps on how to
place a tempo change, refer to the Score
Expressions chapter.
Tablature Settings
If
you have selected a tablature staff, the Measure Dialog provides the option to
choose whether to automatically transcribe the notes you enter into the
standard staff above it, to modify guitar string, and to select tunings several customizations for
rhythm notation, including stem direction and length. To edit these options,
'Tab' at the bottom to navigate to the submenu illustrated:
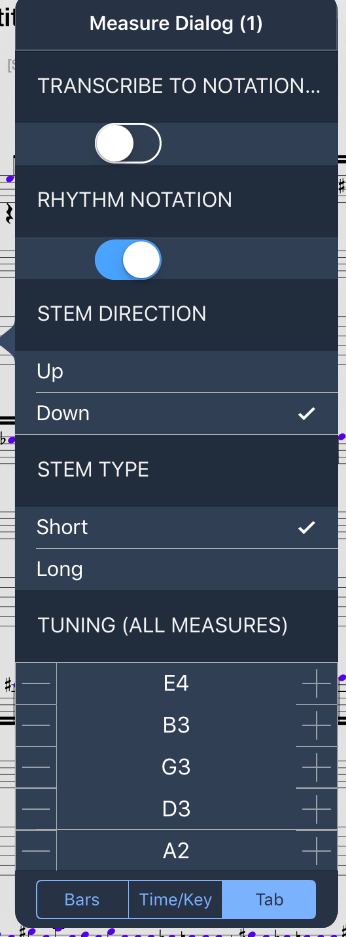
Measure Numbers and Other Score Settings
•
To
customize measure/bar numbers and other measure & part settings, refer to
the instructions under the Score
section.
Multi-Measure Rests / Multi-Bar Rests
• To create a multi-measure rest with options 1 or 2, you must first make sure the empty bars you’d like to collapse are filled-in with whole rests (if not using the automatic option).
• Make sure that no bar you wish to collapse accidentally contains a half-rest, or any incomplete bars that contain notes and/or rests. This will prevent the bar from becoming part of a multi-rest.
• For multi-voice staves, you will similarly need to make sure that other voices are either empty, or contains a whole rest.
Three ways to create multi-rests are provided:
1. Manually creating a multi-rest of flexible length (Recommended)
a. In Select Mode (![]() ), tap the first whole rest at
which the multi-bar rest should begin, then choose the Create Multi-Measure Rest menu item (highlighted) that appears
above the selection. Doing so will mark the corresponding bar number as the
start of a new sequence of multi-bar rests.
), tap the first whole rest at
which the multi-bar rest should begin, then choose the Create Multi-Measure Rest menu item (highlighted) that appears
above the selection. Doing so will mark the corresponding bar number as the
start of a new sequence of multi-bar rests.
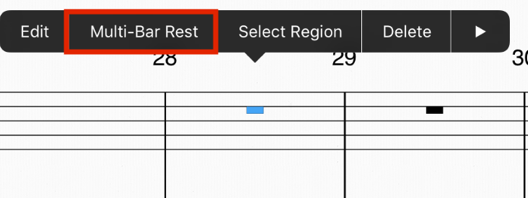
b. This will create a ‘flexible-length’ rest, from which you can
adjust the length of the multi-rest by simply adding consecutive whole rests
after the bar from step a.
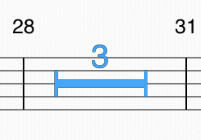
c. Note that in order to create a proper multi-rest spanning more than one staff for printing, viewing, or
editing with Option 1, you will need to repeat 1b for the other staves (by
filling those staves with whole rests). If not performed, the multi-rest from
1a will be denoted by a numeral indicating its length (illustrated) if the
staff were to be printed alone (i.e. as part of a single part printout of your
score).
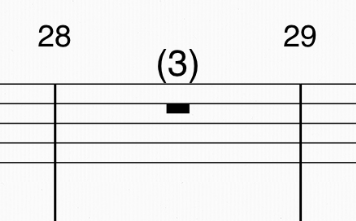
2. Creating a multi-rest of a maximum specified length
In Select Mode (![]() ), a second option is to drag a
rectangle over one or more consecutive whole rests, then select
“Create-Multi-Measure Rest”, to specify a ‘fixed-length’ multi-measure rest. To
select measures across multiple staves, you will need to use the Region Select
menu to highlight the bars. Then choose the Select Notes option before creating
the rest.
), a second option is to drag a
rectangle over one or more consecutive whole rests, then select
“Create-Multi-Measure Rest”, to specify a ‘fixed-length’ multi-measure rest. To
select measures across multiple staves, you will need to use the Region Select
menu to highlight the bars. Then choose the Select Notes option before creating
the rest.
3. Automatically create multi-rests (New, Recommended)
SP 5.2
now allows multi-bar rests to be auto-created for empty or rest bars. To turn
on the new project-wide setting, navigate to Score Menu > Display Settings
> Multi-Bar Rests > Auto-Create. This preview feature will collapse
empty/rest measures when viewing, editing, or exporting.
To shorten or delete a multi-rest (applicable only to options 1 or 2
above):
–
You
can shorten the rest one bar at a time by selecting the multi-rest, then
choosing the Delete menu item (or alternatively, the Delete key from the
Navigation Toolbar).
–
To
completely remove the multi-measure rest property (and tell SP not to
auto-collapse a particular measure), select the multi-rest, then choose Delete
Multi-Measure Rest
Customizing
Tablature Notation
By
opening the Measure Dialog on any tab measure, a TAB subheading will appear in
place of the Clef option. This will provide contextual settings to toggle
rhythm notation and stems, as well as adjusting stem lengths and tuning.
Measure Dialog Expandable Button
You can manually re-enable an Expandable Button to show the Measure Dialog menu options for Time, Key, and Clef. This setting is available under App Preferences (Home Screen > Settings > Symphony Pro 5 > Show Measure Dialog Expandable Button).
Instruments and Staves
The Instruments Menu
To add or edit the instruments in your score, select the Navigation Menu
popup on the right-hand side of the Navigation Toolbar on iPad (![]() ), or from the top-right corner of
the screen on iPhone (
), or from the top-right corner of
the screen on iPhone (![]() ), and then select the Instruments button
(
), and then select the Instruments button
(![]() ).
The Instruments Window (illustrated) will open, showing the instruments
selected for your current project, or beginning with the default Grand Piano.
).
The Instruments Window (illustrated) will open, showing the instruments
selected for your current project, or beginning with the default Grand Piano.
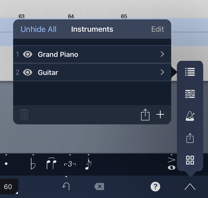
Instruments Menu: for all of the following tasks, first open the above popover dialog as shown
The Instrument Properties Menu
Many of the following items require opening Instrument Properties (illustrated below) from the Instruments menu (shown above). To show the properties for a particular part, simply tap on the part name:
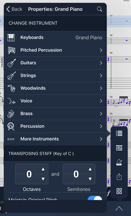
Instrument Properties can be accessed by choosing an existing instrument row under Nav Menu > Instruments
Add a New Instrument
Tap the + button on the bottom right to add a new part to the bottom of the score. You will be presented with an option to choose the instrument assignment
Add a new TAB/Tablature staff
Tap the + button on the bottom right, then navigate to Templates > Quickstart, and select either “Guitar Tab with Staff” or “Bass Tab with Staff”
Remove an Instrument
Tap the Edit button to remove any instrument. Alternatively, swipe an instrument name from the list to the left and then press delete.
Changing Instrument
With the Instruments Menu open, select a different instrument, then tap the row corresponding to the track you wish to reassign. This will open Instrument Properties (illustrated).
If necessary, the appropriate clef will be chosen automatically, and you will be alerted if a transposition change should be applied for instruments that typically do not play in concert pitch.
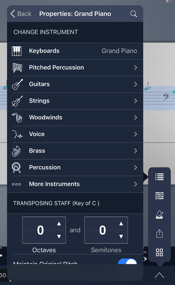
Set a Visible Instrumental Line
To view and edit only one instrument at a time, tap the eye button (![]() ) on the row corresponding to the
instrument name (as illustrated). Deselect or select all buttons to make all
staves visible. To apply changes, choose Apply at the top left.
) on the row corresponding to the
instrument name (as illustrated). Deselect or select all buttons to make all
staves visible. To apply changes, choose Apply at the top left.
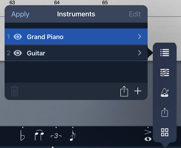
If you wish to export only one particular part to PDF, set the part visible before opening the Export menu. For more details, read the Export section.
Reposition an Instrument Vertically Within a System (Staff Spacing)
SP will align staves automatically depending on the musical
objects or notes that appear in-between bars. Multiple musical staves do not
have to be equidistant from each other in a system. To give a staff extra space (for lyrics, or a
complex line), go to Select (![]() )
mode.
)
mode.
Next, tap on the left hand barline of the staff you wish to reposition. A red square should appear on the barline, as shown. Touch and slide the blue square up or down to reposition your musical line. If the handle is at the top-most staff, you will specify a system-to-system spacing, whereas on other staves you will apply a spacing between staves.
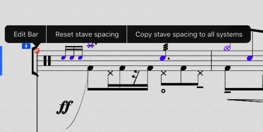
The
above context items appear when tapping any bar-line.
Apply a staff or system spacing across all musical lines
To
set a default spacing across the entire score, tap on any left-hand bar-line to
show the same handle (illustrated above). The following dialog will appear:
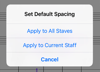
Choose
“Copy stave spacing to all systems”. To reset the alignment to the recommended
default, choose “Reset stave spacing” instead. If the handle is at the top-most staff, you will specify a
system-to-system spacing, whereas on other staves you will apply a spacing
between staves.
Changing Transposition
To adjust the transposition of an instrument, tap on the row corresponding to the track you wish to modify to show Instrument Properties for the corresponding instrument. At the bottom are two number pickers that allow you to adjust the number of octaves and semitones that are offset from what is written. The transposed key is also shown. Positive values indicate that an instrument is played higher than written, while negative values indicate the opposite. To apply changes here, tap on 'Apply Transposition', which will appear at the top right corner of the menu after modifying either field.
You can also specify whether you wish to apply a transposition without modifying the written notes and key signature. To do this, turn on the switch labeled "Maintain Original Pitch". However, you must do so before applying the transposition.
Concert Pitch
•
If you wish to view the entire score in Concert
Pitch, use the corresponding option in the Score Menu (![]() ) (as illustrated)
) (as illustrated)
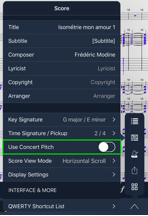
Open Key Signature
· An open key can be specified under the Instruments Menu > Instrument Properties. Under the Transposition Heading, turn on the switch labeled accordingly (‘Open Key’). This results in a key signature of C major for the chosen part, regardless of transposition or actual key signature.
Changing Part Name & Reordering Staves
To modify part names, or to rearrange tracks, tap Edit at the upper right of the Instruments menu. You can now tap on the label for the instrument to edit the part name. To rearrange tracks, drag the right end of the track entry to rearrange its position.
Specify Part Abbreviations
Tap a part in Instruments to open the Instrument Properties menu, then look under Part Names > Part Abbreviation
Staff Groupings
Vertical brackets to the left of the staff are used to indicate a system of grouped instrument families. Staff Groupings are now constructed by touching and surrounding instruments to be grouped within a measure (Select mode) using the pop-up blue square, and selecting the Edit Part/Instrument Groups button in the pop up menu (Please see Cut/Region Select).
Other Instrumental Setting Locations
To adjust the volume of a particular track, see Playback.
To select a different clef, see Clef Changes in Measures.
Time and Key Signatures
You can edit the Time Signature and Key of the entire score by first opening
the Score Menu (![]() ).
).
Tap the Time Signature/Pickup bar, or the Key select bar to edit or set the time and key for the beginning of your score. If 'Use Dotted Quarter' Meter is checked, there will 3 eighth notes to the beat, regardless of the beat unit.
To add a time or key change at other points in your music, see Time and Key Signature Changes in the Measures page.
Voices/Layers
Creating and Editing a Multi-Voice Staff
Tap quickly on the Voice (V1) button (illustrated fig. 1) in the Navigation Toolbar to toggle between voices. The button's indicator will update to the voice/layer corresponding to the currently active voice number.
• By default, when multiple voices are being used, odd-numbered voices have stems up, while even-numbered voices have stems down.
• Figure 2 shows how notes are highlighted according to the active voice number
![]()
Fig. 1: Voice Button highlighted in green: activate to toggle between
voices 1-4
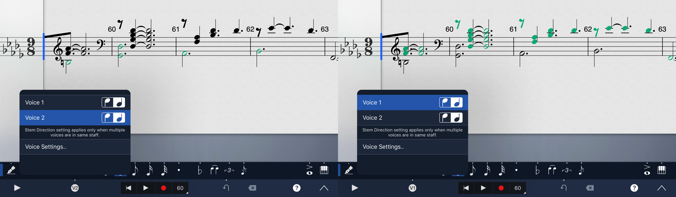
Fig. 2: After toggling the Voice Button by tapping once, notes corresponding to the chosen voice number will be highlighted. The highlight color reflects the layer at which notes are being added or edited.
Voice/Layer Properties
To change voice settings, including stem directions, or to delete a voice, tap and hold on the Voice button, then tap Voice Settings... The Voice Settings window will pop up with options to modify the active layer, default layer stem directions, voice colors, as well as providing options to add a new voice.
For the remainder of this chapter, open the Voice Settings Menu (illustrated) by Long-Pressing the Voice Button

Voice Settings Menu: Long-press the Voice Button, then choose Voice
Settings to open the menu
Change Voice Stem Directions
Long-Press on the Voices button. Use the up/down stem icons in each voice entry to set the default stem direction for the corresponding voice to either up or down. These settings will take effect if a measure has at least one note or rest across two or more voices.
Change Active Voice Color (Complete Bundle)
– All notes in the currently selected voice will be highlighted in purple by default. To disable this highlighting, turn off the Highlight Voice switch inside the Voice Settings Menu
– All notes in the currently selected voice will be colored green by default, but you can customize the color in Version 4, by choosing the “Active Voice Color” option from Voice Settings
Specify the Maximum Number of Layers to Toggle Through
You can change the number of voices/layers you wish to toggle through as an application setting. Navigate to “Voice/Layer Toggle Options” within the Voice Settings menu to set this preference. If your score contains greater than the specified number, however, you must first delete the extra layers before the setting will take effect.
Hide/Make Rests Invisible
See the Notes & Rests chapter on how to make rests invisible by clicking here.
Playback Options
The Navigation
Toolbar,
accessible whenever you are in Pencil or Select Mode, is always available below
your score (the black bar running across the page).
Transport controls are found
in the center of the Toolbar, with the standard Play ( ![]() ), Return to Beginning (
), Return to Beginning ( ![]() ), and Record (
), and Record (![]() ) controls available, plus the
measure number indicator (cursor position).
) controls available, plus the
measure number indicator (cursor position).
•
If
you are in Select (![]() ) mode, and a single note or rest
is selected, playback will begin at the active measure.
) mode, and a single note or rest
is selected, playback will begin at the active measure.
•
If
no notes are selected, playback will begin at the first measure on the current
page.
•
To
quickly play back your composition from a certain measure, do a three-finger
tap once on the score. The measure that is played is based on the average
position of all three of your touches.
•
Playback
may be started by using a QWERTY keyboard, and tapping the default Space bar to
toggle playback on and off. Read the help section on QWERTY keyboard for more
details.
Horizontal cursor
position can
be stepped through using the left and
right Step Arrows (![]()
![]() )
at the far left of the Navigation Toolbar.
)
at the far left of the Navigation Toolbar.
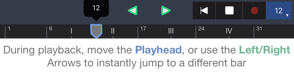
The
Undo
icon ( ![]() ), found to the right of the Step Arrows will
remove your latest operation. It acts like an eraser to undo the last-placed note, accidental, clef, dynamic, etc. It will
also undo a real-time recording if
that was the last operation you completed.
The 20th century composer Arnold Schoenberg was said to have
wished his UCLA students had erasers on both sides of their pencils. This undo button comes pretty close to that
eraser, so beware.
), found to the right of the Step Arrows will
remove your latest operation. It acts like an eraser to undo the last-placed note, accidental, clef, dynamic, etc. It will
also undo a real-time recording if
that was the last operation you completed.
The 20th century composer Arnold Schoenberg was said to have
wished his UCLA students had erasers on both sides of their pencils. This undo button comes pretty close to that
eraser, so beware.
The
Staff Side Panel
Playback
Shortcuts for each instrument are also available in the Staff Side Panel when
your Project is set to Horizontal Scroll Mode.
Go to the Score Window ( ![]() ) from the Navigation Menu (
) from the Navigation Menu ( ![]() ), and slide the Horizontal Scroll
Switch on. When you return to your
Score, a single system will be visible as a scroll, with a Side Panel
indicating the Instruments in your system, along with their names, clef, time
signature, and key.
), and slide the Horizontal Scroll
Switch on. When you return to your
Score, a single system will be visible as a scroll, with a Side Panel
indicating the Instruments in your system, along with their names, clef, time
signature, and key.
If
you slide the Staff Side Panel to the right, Playback shortcuts for individual
instrument Mute, Solo, and Volume will be available. Tapping in
the Instrument Names will introduce
a cursor and an on-screen QWERTY keyboard for renaming the part. You can also
tap on one of the strips next to each part as a shortcut to edit the
instrument, delete the instrument, or add a new part.
The
Playback Options Window
Additional Playback Options can be accessed
by tapping the Navigation Menu popup (![]() ) , and selecting the Playback Options (
) , and selecting the Playback Options (![]() ) icon. This menu can be opened
during playback, and options can be modified during playback.
) icon. This menu can be opened
during playback, and options can be modified during playback.
Metronome-Click
Options
Tempo.
Slide
the up/down controls inside the right-hand BPM (Beats Per Minute) box to set the
metronome tempo for Playback and Recording.
Alternately, a quick tap on the top half or bottom half of the BPM box
will increment or decrement the tempo for fine control.
Alternately, tap the left hand box labeled Tap to set Tempo at the tempo you wish
to use, and the right-hand BPM box will reflect the proper tempo for Playback
and Recording.
Metronome
Volume
is easily set by sliding your finger or Apple approved pen around on the green
knob volume control in the Volume
box. A number within the circle will
change to reflect the volume that is currently set.
Select the Metronome/PlayHead bar to choose audible sub-divisions of your
chosen tempo: 1x is Normal, with 2x, 3x, and 4x subdivisions selectable (Complete Bundle). For emphasis on the first
beat of each measure, slide the Emphasize
Downbeat switch to On.
MIDI/Recording
Options may
be set to control Quantization and other input recording choices by selecting
this menu button. See Quantization choices in Record
Loop
Measures
Tap the Loop Measures Menu bar to open the Loop Dialog Window. Select a
first measure (From) and a last
measure (To) for playback by sliding
the number boxes up or down. For fine adjustment, tap on the upper or lower
parts of the number boxes to increment or decrement your Loop choices. Now,
whenever you begin playback from the Play icon, playback will loop between the
specified first measure and last measure.
• Turn Auto-Repeat on to apply the above
option to all measures.
• An alternate way to
set a looped playback range is to first open the Region Select
menu in Select Mode, then drag the selection rectangle to the bar(s) you
want to loop. It is not necessary to select the entire bar(s).
Mixer
Tap the Mixer option. In this window, each instrument (track) has a
circular (up/down) volume control at the right, with select buttons for Solo
and Mute. Circular sliders are also available
for Pan, and for control over the attack and release characteristics of each instrument
Master
Track
• Selection of the Master Track bar opens a window with
global plug-ins for Playback control, and multiple choices for Swing Playback qualities:
• The Compressor Slider regulates the Maximum
dynamic range of your volume output, to keep large dynamic swings under
control.
• The Chorus Slider creates a sense of
multiple instrumental voices for your global output.
• The Reverb Slider increases the level of a
set reverb characteristic to your dry signal
• Switching the Timing Randomizer to On creates small
tempo changes in the Playback of your project to reflect a more human, slightly
variable performance.
Playback
SWING Options
In the Master Track Window, six Playback
Swing variations are selectable: Eighth-Note Light, Medium, and Heavy, as well
as Sixteenth-Note Light, Medium, and Heavy. The default selection for Swing is
set to NONE.
Record and MIDI Devices
There
are several ways to enter notes in a ‘real-time’ recording process.
•
For
each of the following, first tap on the Record (![]() ) icon to go into Recording mode.
) icon to go into Recording mode.
•
To
exit Recording mode, tap any of the icons in the notes
toolbar, or dismiss the Keyboard with a double tap.
Realtime
Note Input
The
record tool allows you to play-in notes in realtime
using the virtual keyboard or an external MIDI keyboard. The bar from which
recording will begin is highlighted in red. Tap on this highlighted box again
to begin recording. A recording tracker will appear, showing you the
approximate current recording position. During the count-in, the tracker will
be colored blue. When the actual recording starts, the tracker will turn red,
and the Record icon will stay lit. To stop recording, tap the record button
again. The highlighted box will reappear.
After
you've stopped recording, the highlighted box will reappear if you are still on
the same page. Tap the Record button again to start from the measure you began,
or tap on a new measure to start elsewhere.
To
start playback from the highlighted measure, tap Play instead of Record. Tap
Play again to stop playback. The highlighted box will reappear. To exit
Recording mode, reactivate either Pencil or Select mode.
For
users accustomed to composing with a MIDI keyboard, using the record tool is
the fastest way to input notes.
Changing
the Starting Measure
A
selection box will be over the measure where playback begins. To change the
measure where recording should begin, tap on any measure on the score.
Recording
on Two Staves (Grand Staff)
You can record one or two tracks at once. With Record mode
turned on, simply tap, hold, and drag on the score to create a red selection
box that spans two tracks. The red highlight box should then span both clefs.
This
can be used to record both parts of a grand staff simultaneously. The recorder
will try its best to divide the performance neatly across the upper and lower
voices, and across the different tracks.
During
recording, tracks that aren't being recorded will be played back along with the
metronome.
Multiple layers (or voices) are treated as
separate tracks, reducing the number of overlapping notes on the same staff.
MIDI
Keyboard Input Enable
You
can record, insert, and edit notes with an external MIDI keyboard. Plug in any
Core MIDI compatible keyboard or similar device using an iPad USB adapter, and
a standard USB cable coming from the USB output on your keyboard.
•
Older
iPads will need to use the Apple Camera Connection Kit to connect. For newer
iPads, The Lightning to USB Camera Adapter for newer iPads will enable the
standard USB cable used by MIDI devices to connect successfully.
To
Enable your keyboard once connected:
•
Open
Symphony Pro (you may connect the keyboard before or after Symphony Pro is
open)
•
Tap
the Instrument Icon (![]() ) at
the far right in the Note Bar
) at
the far right in the Note Bar
•
From
the popup choices, tap on the MIDI icon.
The icon will now be highlighted (in blue). You can turn the MIDI instrument input
off by tapping on the popup icon a second time.
•
A
message will appear on your screen stating “MIDI device added.”
Enabling
Bluetooth Input
You can now connect a Bluetooth-enabled
MIDI device and use it with SP provided the following steps:
o
First make sure the device is paired
with your iPad under Home Screen > Settings > Bluetooth
o
Within
SP, navigate to Playback Options, then MIDI Connections
o
Select
Bluetooth Setup at the top right corner of the popup menu, then choose the
device to enable for MIDI input
o
Dismiss
the Bluetooth MIDI devices popup, then make sure the switch labeled “Allow MIDI
In” is turned ON
MIDI
Keyboard Output
One
staff or part may be sent as a MIDI output at a time. To access MIDI Out:
go
to the Playback icon (![]() ) from the Navigation Menu popup (
^), and select Midi/Recording Options.
In MIDI Connections, select Send MIDI Out. A Message will verify your output
connection.
) from the Navigation Menu popup (
^), and select Midi/Recording Options.
In MIDI Connections, select Send MIDI Out. A Message will verify your output
connection.
Metronome,
Count-In, and Multi-Voice Settings
Tap
the Playback (![]() ) icon in the Navigation Menu (^)
popup. Tempo, Metronome Volume,
Metronome/PlayHead, and other performance settings are available (see Playback).
) icon in the Navigation Menu (^)
popup. Tempo, Metronome Volume,
Metronome/PlayHead, and other performance settings are available (see Playback).
•
Metronome Volume: Set the Volume
control with your finger by touching and following the circular green dial at
right to obtain a good balance for your metronome click. The volume of the
metronome can be adjusted during playback, as well as when stopped.
•
Metronome Count-In:
Select
MIDI/Recording Options to set the
number of measures you wish to hear before recording begins. Default count-in set at one measure.
•
Select
Metronome/PlayHead to set the
subdivisions of a beat for your metronome, and to Emphasize Downbeat.
Quantization
and Recording Options
Tap
the Playback (![]() ) icon in the Navigation Menu (^)
popup, and select MIDI/Recording Options.
The following quantization and note placement options are available:
) icon in the Navigation Menu (^)
popup, and select MIDI/Recording Options.
The following quantization and note placement options are available:
Quantization: select Quantization and the Quantize
Recording Dialog will pop up.
Quantization levels may be chosen from a quarter note to a Sixty-Fourth
note. Alternately, you may select automatic, which determines the smallest
value of note value in recording based upon time signature and tempo.
Overlapping Notes: with this choice
switched to “off” (slider to left), previously played notes will not be allowed
to sustain over the newly played notes using ties.
Allow
Triplets: Triplet divisions
will not be recorded with this switch set to “off”.
Multi-Layer: In “off” mode, only one voice/layer will
record at a time.
QWERTY Keyboard
The QWERTY Keyboard
Access to a Bluetooth-connected QWERTY keyboard can greatly speed up screen
navigation and the entry & editing of notes. With Symphony Pro open, and a
QWERTY keyboard connected, various operations can be selected via default keystrokes
without leaving the attached keyboard for a screen touch. Starting Version 5,
Symphony Pro makes it convenient to navigate the score, enter notes, and edit
note & bar properties without interacting with the screen.
QWERTY Shortcut
List
•
To access the QWERTY Keyboard Shortcut list, tap
the Navigation Menu popup (![]() ) at
the right-hand side of the Navigation Bar, and select the Score Menu (
) at
the right-hand side of the Navigation Bar, and select the Score Menu ( ![]() ). At the bottom of the Score menu, tap the
QWERTY Keyboard option to see and/or customize the various default commands
(illustrated below). Drag up or down in this window to see the complete list.
). At the bottom of the Score menu, tap the
QWERTY Keyboard option to see and/or customize the various default commands
(illustrated below). Drag up or down in this window to see the complete list.
• From the QWERTY Keyboard, the command list can be opened at any time by typing Option-K or Command-K
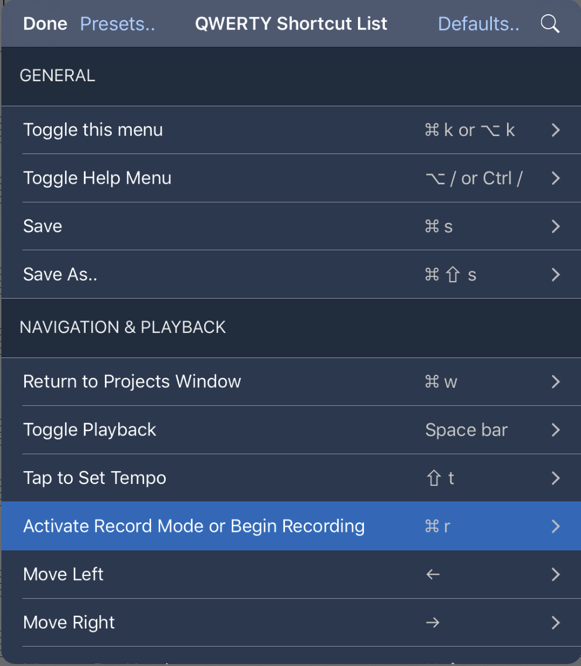
Default Keyboard
Shortcuts
A table of the default key assignments as of SP 5.0 is provided in the link by clicking here.
Reassign a Shortcut
Every QWERTY keyboard default command can be reassigned to a
user-constructed choice. From the
Keyboard Command menu, tap on the command item you wish to modify. A Reassign
Shortcut menu will appear with a Key input box, plus a choice of special keys
to expand your user assignment choices (for example, tapping the Ctrl box, and
adding the keystroke ‘K’ will set Ctrl-K as your new choice for a command).
• Tap the upper right hand Defaults.. button to restore the Keyboard Command List to its default selections.
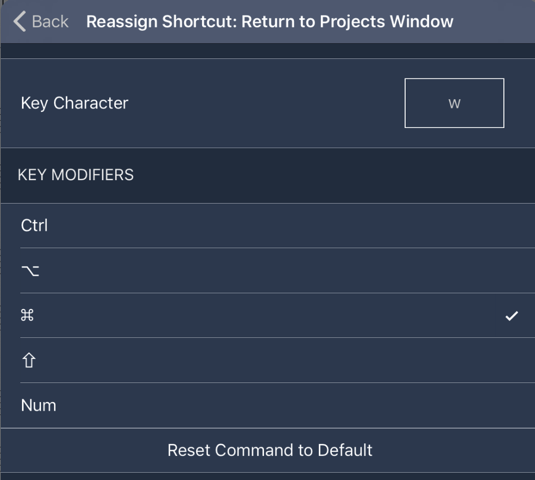
Adding Notes with QWERTY
Keyboard
Switching editing
mode
Press A or S to switch to Write mode or Select mode, respectively.
Adding a note or
rest
To add notes, use the default ‘c’ key. This corresponds to the command “Add new note from cursor or current selection” within the Shortcut List. In Select mode, this command adds notes to the currently chosen chord underneath the cursor. In Write mode, this command will add a new note and advance the cursor. In either case, pressing up or down arrow will transpose the newly added note by a scale degree.
Toggle between note and rest entry by pressing ‘R’.
Note input via external keyboard works with or without the input cursor & on-screen instrument visible. However, if the on-screen instrument is dismissed, you must first activate Select mode (S) from the Navigation Toolbar, then select an existing note, before you can enter a new note in this case.
Selecting a note or chord
Press the semicolon (;) by default to highlight a note or chord at the input cursor location. If you have a chord selected, press Option + left or right arrow to toggle between individual notes of that chord.
Other Note Input
& Editing Commands
You can review other important editing commands under the Selected/Highlighted Notes, Input Cursor, and Note Toolbar Actions headings of the QWERTY Shortcut List. These commands include how to toggle dot (default D), choose between note values, toggle tie (T), transpose by octave (Shift + up/down arrow), or navigate the input cursor.
Behavior of actions listed under Note Toolbar Actions is equivalent to activating a Notes Toolbar Item using touch, and will depend on which editing mode (Select or Write) you’ve chosen: In Select mode (S), toggling an item such as note value will modify the chosen chord at the input cursor location as well as activate or deactivate the toolbar item. In Write mode (A), toggling an item will simply activate or deactivate the toolbar item. See the Notes chapter for more details on the two editing modes.
Cut, Copy, and Paste with QWERTY Keyboard
You can define a Region Selection Area entirely using standard key combinations. The quickest way to define a selection area is by first moving the Input Cursor to the desired start location of the area, then pressing Shift + the Left or Right arrow by default, which will bring up the rectangle and extend the selection forwards. Pressing the above key combination a second time or more will extend the selection backwards or forwards, to closest adjacent beat or measure.
To dismiss the Region Selection Area, you can use the Deselect Notes key command (default: ‘ apostrophe) key ).
Import
Compatible
Imported/Exported Files Formats
Symphony
Pro can import Symphony, MusicXML, MXL, and MIDI files. Once imported to the
Projects window, your files can be opened, edited, expanded, and saved to other
formats. You can also save your file back
to its original imported format, and re-open your newly saved file in another
application.
Adding files to
iTunes from your Mac/PC
Symphony
Pro can only import files that have been added to the Symphony Pro folder
inside iTunes. To add files:
- Navigate to the File Sharing
area in iTunes (https://support.apple.com/en-us/HT201301)
- Select the Symphony Pro icon
- Click the Add... button to add
files.
- Alternatively, drag and drop files
into the Documents pane.
- To remove a file, select the file
and press the delete key.
- After adding files, the device
will automatically be synced.
- Added files will now be available
to be copied to Symphony Pro.
Imported/Exported
Files Menu (iTunes Folder)
Once
files have been added you can begin importing them into the app.
Inside
the Projects window menu, tap on the Start New Project button (![]() )
then select Imported/Exported Files. A list of files that can be imported will
appear. Tapping on a file will copy and convert it to a Symphony Project file.
When finished, the score will appear alongside your other projects in the
Projects window, and will be available for editing and development.
)
then select Imported/Exported Files. A list of files that can be imported will
appear. Tapping on a file will copy and convert it to a Symphony Project file.
When finished, the score will appear alongside your other projects in the
Projects window, and will be available for editing and development.
Open Files from Other
Apps
You
can open a supported file in Symphony Pro from other apps, such as Mail and
Safari. Just bring up the Open In... dialog for a file and tap Open in Symphony
Pro.
Remember to save your work with
a new name, if you want to preserve your original file.
Export
You
can export your projects from either the Projects Window or Score Window. For
all of the actions listed in this section, you must first open the Export popover menu by following these steps:
–
If
you’re exporting from the Projects Window:
(1) Tap
'Select' at the top right corner
(2) Select
a score you wish to export from the available projects shown
(3) Tap
the Export button (![]() ) _from
the Projects menu to see the various sharing options.
) _from
the Projects menu to see the various sharing options.
–
If
exporting from the Score Window:
(1) Open
the Navigation Menu (![]() )
)
(2) Tap
the Export button (![]() ) to
see the various sharing options.
) to
see the various sharing options.
Export
File Formats
Symphony
Pro supports exporting to MusicXML, PDF, AAC, MIDI, and Symphony Project files.
MusicXML
is the best file format to use if you want to export a composition and continue
editing it in a different application. You should use Symphony Project files
for archiving and sharing compositions with other Symphony Pro users.
Symphony
Pro can also export your project as an audio track to SoundCloud.
Print
Dimensions
When
exporting a printable document, you are able to set page dimensions in the
Score menu. For instructions, see Page
Dimensions.
Printing
a Single Part
When
exporting a printable document, you are able to export one part at a time by
first setting a visible track. Refer to the Tracks
section for instructions.
Export
to Email
Select
any export file format from the Export popover menu. Tap the Email option to
send the file as an email attachment. An email compose window will appear,
enter the desired recipients in the To: field, then
tap Send. You must have a Mail account configured on your iPad for this to
work.
Export
to iTunes
Exporting
to iTunes is one method of transferring files from Symphony Pro to your
computer. Select any export file format from the Export popover menu, then tap
iTunes (![]() ) to
export the selected file. The file will be saved to your iPad and will become
available in the File Sharing area in iTunes. See File
Sharing in iTunes for more information.
) to
export the selected file. The file will be saved to your iPad and will become
available in the File Sharing area in iTunes. See File
Sharing in iTunes for more information.
File
Sharing in iTunes
To
reach the File Sharing area in iTunes:
• Launch iTunes on your
computer
• Connect your iPad to
your computer
• Select your iPad from
the Devices list/icons
• Click the Apps tab in
the left-hand list
• Scroll to the bottom
of the right-hand window to see the File Sharing area
• Apps on your iPad
that support file transfers will appear in the Apps list
• Select the Symphony
Pro icon
Now
you can move files onto your computer by dragging and dropping them from the
Documents pane, or you can select a file and then click the Save to... button.
To remove a file, select the file from inside iTunes, then press the delete
key.
Send
To
You
can open project files in other connected apps using the Send To feature.
Select any export file format from the projects window, then tap Send To (![]() ). A popup will appear with apps that you
can open the file with. Select one to transfer a file to that particular app.
). A popup will appear with apps that you
can open the file with. Select one to transfer a file to that particular app.
Exporting Files & Projects to Dropbox
Alternatively, you can use
Dropbox to migrate files easily by exporting your SP projects from your iPad,
by selecting 'Send-to', as described directly above, then choosing Dropbox from
the list of available apps.
AirPrint
/ PDF
To
print your composition over your wireless network to an AirPrint-enabled printer, tap AirPrint (![]() )
from the Export popover menu.
)
from the Export popover menu.
1. Under Export Options, make sure Current Parts
to PDF or ‘All Parts to PDF‘ is chosen.
2. Under Export Destinations Tap Select Printer,
and choose a compatible printer from the list. Then tap Print on the Print
Options dialog to print your composition. To change the page dimensions of a
document, see Page Dimensions.
Sending as PDF document
You can also export your score as an
equivalent PDF, by following the above steps, then choosing Email, iTunes, or Send
to under Export Destination. The exported sheet music will be identical to that of AirPrint.
Printing/Exporting Individual Parts Separately
Version 5 introduces the ability to automatically include each instrument/part as a separate score, yet within the same PDF document. Under Export Options, simply choose ‘All Parts to PDF’. Next, choose AirPrint or PDF under Export Destination.
AirPlay
Symphony
Pro supports the AirPlay feature on your iPad. Enabling AirPlay will let you
stream music from the app or share your screen wirelessly to selected devices.
This feature only works with compatible speakers, stereo systems, AV receivers,
and Apple TV. You can learn more about using AirPlay and AirPlay Mirroring on
Apple's website.
Accessibility/VoiceOver
Accessibility with QWERTY Keyboard and VoiceOver (Under Construction)
The following guide is only a basic
one, intended if you are willing to learn the app with incomplete information,
including how to edit notes, navigate, or manage files & projects in basic
ways. SP5 is designed for use with an external QWERTY keyboard, although MIDI
keyboard is also recommended. Both the iPad and iPhone version of this app have
roughly equivalent VoiceOver (VO) labels and behaviors, since they are unified
in their underlying accessibility & qwerty engine.
You can toggle this help menu by pressing Control+H.
Brief outline of accessible features as of Version 5
.
Labels
and hints for Input Cursor location (bar number, beat value), clef, navigation
bar/note toolbar items, and document navigation
.
Basic
note entry and editing, including with a MIDI keyboard, QWERTY keyboard, or
On-Screen Piano
.
QWERTY
key commands and shortcuts, many of which provide contextual VO feedback
–
To view
or modify the available QWERTY keyboard shortcuts/commands by pressing
Option+K. To learn more about how to use the shortcuts, refer to section 2
later in this page. Some examples follow:
–
To add
notes
o
Press c
to add a new note
o
Press up
or down arrow to transpose
–
To Cut,
copy, and paste: Press the shift+left or right arrow
–
Note
Selection Area to transpose (press semicolon)
–
Score
Navigation with the arrow keys
.
Editing
of score symbols, including dynamics, articulations, and tempo changes
.
Chord
symbol & lyric entry
.
Support
for accessibility adjust swipe gestures across standard elements
including switches, number pickers, and knobs
.
Quick-nav
support for toolbars and menus
.
Magic
Tap to toggle playback
Reviewing or Modifying SP’s QWERTY Shortcuts
. Option+K is the default combination to toggle the QWERTY Shortcut List menu, descried in detail below:
. The top level of this menu is a table of all shortcuts specific to SP; the left column lists the action/command names, while the right-hand side labels the corresponding key combination for the corresponding action
. To customize any of the default key commands:
– Activating a row listed at the top-level will open a secondary submenu labeled Reassign Shortcut. This will allow you to edit the QWERTY shortcut for that command. Reassign Shortcut has two main input fields. At the top is a text field for entering the letter or character; below it, key modifiers including Command, Option, and Control are provided. Activating one of the latter items will check or uncheck the corresponding key modifier. To finish editing the shortcut, return to the top-level menu using the back button at the top-left.
– To un-assign a shortcut such that it is not bound to any key combination, activate the button labeled Reset Command to Default at the very last row of the Reassign Shortcut submenu.
– To restore all shortcuts to their default bindings, return to the QWERTY Keyboard Shortcuts Menu top level, then activate the Defaults button at the upper right corner of the submenu window.
Creating a New Score
.
From the top left corner of the Projects Menu,
activate the option labeled 'New Project'
.
Two options will be presented for creating a new
score:
.
"Quick Start" will present a mini
dialog to choose between a few quick score properties. Tap 'Done' on the top
right to create a blank project.
. "Choose Template" will present a selection of preexisting score arrangements to choose from, including Treble Staff, Bass Staff, String Quartet, and more
. Upon creating a score, you will always be able to add or remove instruments flexibly, using the Instruments Menu; to access it:
. Open the Navigation Menu popup button from the bottom right corner of the Navigation Bar (or press command-N) when in the Score Window
. Activate the button “Instruments Menu” above the previous button
. Activate the button "Add a New Part" in the lower-right corner.
. This will show the available instrument families to choose from; selecting an instrument family, then a new instrument name, will complete the addition of a new staff to the score
QWERTY Commands in Depth: Score Editing Window (under construction)
Keyboard shortcuts are the primary
way to edit, as well as the quickest way to navigate the score. Quick-nav must be turned off in
order to use the arrow keys for score navigation.
To view the key commands that are specific to accessibility qwerty shortcut
list (Option+K), or PDF guide covered above, then look under the
Accessibility/VoiceOver heading.
QWERTY Shortcuts Main Help
You can view the main help chapter for keyboard shortcuts by clicking here.
The Input Cursor
The Input Cursor reflects the current editing location when the focus cursor is on the score or a particular measure
Editing Modes
See Help Menu > Notes and Rests > Introduction for a guide covering the differences between the two modes
Adding Notes
You can add notes at the Input Cursor Location by pressing C. In Select Mode, you will only add to the current chord.
Editing Notes
To select the notes or chord at the Input Cursor location, press semicolon. Press option+left or right to select only a single note in the current chord.
Writing & Editing Chord Symbols & Lyrics
The Chord Symbol and Lyric tools have become VoiceOver compatible starting Version 5. This encompasses functionality in terms of QWERTY hints, QWERTY navigation, and compatibility with SP's shortcuts (default: Option-K) when editing their respective text fields. Appropriate steps to access these tools are as follows:
1. Press Cmd+E to toggle open the Score Symbols Toolbar. Keep in mind that Select mode is the only available mode with the toolbar open and with VO turned on.
2. Press Command+4; this will switch the Score Symbols Toolbar Category to the Text-based expressions.
3. The Chord Symbol button will be the 1st icon from the left of this toolbar, and the automatically-focused button upon switching to the new category (this applies to any switching between the 6 expression categories).
4. The Lyrics button will be immediately adjacent to the right of the Chord Symbols tool, so can be focused by pressing Control-Option + Right Arrow
5. Before you start editing either text element, keep in mind the mode of operation will be identical, in that once you begin editing:
– You will be editing text contents via the QWERTY keyboard.
– The Input Cursor will always correspond to the bar and beat value at which editing takes place.
– The letter you're typing should be spoken letter by letter, and identical to the editing behavior when editing any other Text Field in a menu for instance.
6. With the above in mind, next activate the focused Chord or Lyric button with VO-Space or double-tap on screen. This will create a new, editable chord or lyric text field & cursor at the note input cursor location, along with any preexisting text if there is a text element of the same kind at the location.
7. To navigate or execute any QWERTY command, there is only difference to keep in mind when editing either text element, and that is in navigating the Input Cursor horizontally.
8. The text field will intercept the default Left or Right arrow key, so Option + the Left or Right arrow key will be the designated (read-only) shortcut in this special case.
Key tips to make
editing & navigating more convenient in the context of Chords & Lyrics:
.
To read back the Chord and/or Lyric contents at
the note Input Cursor, you will need to do so manually. Control-Option-P is the
default shortcut (full command label: "Read back attached score symbols
for selected note").
. To read back the location of the Input Cursor in full, including track & bar number, Command-P is the default shortcut (full command label: "Speak Cursor Position in Score").
Returning to the Projects Menu
. To navigate from a Score to the Projects Menu, first activate the Navigation Menu Popup on the lower-right corner of the screen, then activate the Projects Menu button above it
Limitations
. It is recommended to turn off audio ducking to allow musical feedback to play simultaneously with Voice feedback; this can be done via the corresponding Rotor Control option
. With QWERTY input, quick-nav must be turned off in order to use the arrow keys for score navigation, such as to move the cursor, transpose notes, or extend/contract a region selection.
. To use a MIDI input device: A camera connection kit or a lightning to USB camera adapter cable is necessary.
. Unsupported features planned for a Version 5 release in 2017
QWERTY key bindings to add or toggle score symbols/expressions
Other Resources
.
System QWERTY VO shortcuts: http://pauljadam.com/demos/voiceovercommands.html
New Features
Handwriting Tool for Apple Pencil & Capacitive Stylus
Version 5 introduces Handwriting recognition, allowing you to sketch & convert into formatted notation, among other useful gestures. This is the only paid upgrade to enable all of Symphony Pro’s features.
-
To enable or restore the upgrade, choose
Handwriting Tool at the top left corner of the Help Menu navigation.
-
To read the help guide covering this
feature, refer to the Working
with the Handwriting Tool chapter of the Quick
Start guide.
Version 4: Complete Features Bundle
As of Version 5, the Version 4 Complete Features Bundle is available free of charge. More information about this past In-App Purchase is available here.
Support, Forums, and Social Media
The Help Connection
There
are several ways to get support, ask questions, and keep up with current
improvements and news from Symphony Pro.
Two of the quickest options will be found on the Help Manual (![]() )
Menu Bar:
)
Menu Bar:
•
Feedback. Select the Feedback ('Feedback’)
button on the left side of the Help Manual Navigation bar. A Feedback Menu will
pop up containing selections for Bug Reports, Crash Reports, Feature Requests,
and Other, to send us an email on other support issues. We encourage the use of
these communication channels for reporting problems and feature requests as
well, as they provide a systematic way to keep in sync with our user’s needs.
•
What’s New. Select the What’s New ('What’s
New’) button at center left of the Help Manual Navigation bar to get a
popup Menu to view Improvements & Fixes, New Features, Open Release Page
information, and additional announcements which may be added from time to time.
Web Community
Visit
our forums at forums.symphonypro.net
to find answers to previous questions, start new questions or discussions, make
feature requests, and provide feedback. Forums can also provide information
about upcoming features & improvements.
Web Support
Please
visit the Support Center at symphonypro.net/support
if you need help. You may also Email us at support@symphonypro.net to ask
questions directly. We do our best to provide assistance 7 days a week.
Social
Join
us on Facebook at facebook.com/symphonyapp or follow us on Twitter @symphonyapp.
Bug Reports
While
we beta-test our releases for a substantial length of time before release, bugs
can occasionally creep in. We want
to receive your report on something that isn’t working the way it should! Here are a few helpful guidelines
to use for an email or forum post that will help us find the problem quickly:
- Tell us the
steps we need to take to reproduce the issue
- What you
expected to happen, and what the actual result/issue was
- Attach a file
that shows the problem you are reporting, along with your message (if
applicable)
For
stability issues including crashes, please add:
- Your iPad model
- Your iOS version
About
Current Team
Lead
Developer
Philip Lee
Software Development Advisor
Daniel Wyman, DMus / Professor Emeritus at San Jose State University
Development Team
Application
Design, Development, and Engineering
Philip Lee
Ross Miller
Duong Pham
Graphic
Design
Ross Miller
User
Interface & Interaction Design
Ross Miller
Software
Integration & Automation
Duong Pham
Software QA
& Beta Test Management
Philip Lee
Ross Miller
3rd Party Contributions
Graphic & User Interface
Design
Matthew Skiles (www.dvq.co.nz)
Exceptional Beta Testers
Steve Smith
Hans Bakker